
Of all the wonderful and beautiful cocktail garnishes, the citrus twist is the most classic and widely used.
In addition to visual appeal, citrus peels are full of aromatic oils, which when expressed, add depth and nuance to the finished cocktail.


This photo guide will teach you how to create some of the best known citrus peel garnishes, as well as offer some helpful tips for creating my signature carved citrus peels like the image above. Follow me on Instagram for more garnish inspiration!
If you want to learn more about the different types of garnishes and how they work to improve cocktails, check out my Art of the Cocktail Garnish post!
You may also like How to Make Cocktail Garnishes (for Beginners) or my 5 Easy (and Beautiful) Cocktail Garnishes

Citrus peel garnish tools
First things first, let's cover the tools you'll need. To peel citrus, you'll need:
- Sharp paring knife
- Vegetable peeler (optional, but highly recommended!)
- Cutting board
- Ripe citrus fruits with smooth skin
A sharp knife is essential for removing the peel from the fruit without also removing too much of the bitter, white pith. If your knife skills aren't so great, opt for a vegetable peeler instead.
Find all my top choice tools in my Essential Tools for Home Bartenders.
I like to use vegetable peelers to remove the peels and a sharp knife for cleaning them up, shaping them, or carving them into shapes or designs. A Y-style vegetable peeler is a great inexpensive tool to start with. This Kuhn Rikon 3-pack from Amazon are my current favorites:


How to choose the best citrus for the job
When choosing citrus, make sure that the fruit has a nice smooth skin and gives a little to a gentle squeeze.
These fruits will taste the best, have the easiest peels to manipulate, and also have the most juice.
Very hard or bumpy-skinned fruits tend to be under-ripe and quite dry, which means they will be harder to peel, less attractive, and contain less of those wonderful aromatic oils we want.
On the other end of the spectrum, you'll also want to avoid fruits that are over-ripe and feel very soft. Peels that are too soft can also be harder to remove and can also be too thin, flimsy, and oily to hold a shape like a twist.

Essential peeling techniques
Now that you have your tools and your fruit, it's time to start practicing peeling. Hold your fruit with your non-dominant hand and carefully, slowly, apply pressure with your knife or vegetable peeler.
If using a knife, make sure to cut the skin off facing away from yourself. If using a peeler, go in whichever direction you feel you have the most control.
The key to removing a citrus peel is to apply even pressure while moving the knife or peeler across the surface of the fruit. This will ensure that the section of peel removed is a uniform thickness throughout.
You can choose to peel off a short swath or one long peel using the entire skin of the fruit.
For the sake of a delicious cocktail, all you need is just enough peel to be able to express some of those oils over the surface of the drink.
For a fancier garnish that's trimmed and shaped, you'll want to have at least a few inches of peel to work with.


How to express a citrus peel
Once you have a piece of lemon, lime, orange, or grapefruit peel to work with, you can opt to stop there, express the peel over your cocktail, and drop it in, or discard it.
My preferred method for expressing is to cut a rectangular piece of peel, hold the peel so that it is facing the surface of my drink, with short sides between thumbs and forefingers, and gently squeeze my fingers together, bending the edges of the peel backward.
This action extracts the oils from the peel, and you'll be able to see them spray out onto the surface of the drink.
If nothing happens when you do this, try again. Sometimes holding the peel from a slightly different angle works better.
If it still doesn't work, try another piece of peel that may have more oils. Every fruit and every peel is a little different.
I find that limes in particular can be hard to peel and hard to express the oils from, while orange and grapefruits tend to be abundantly oily and peel like butter!
How to trim a citrus peel


Once you have a section of peel to work with, you can trim the edges to give it a clean look. I like to give my peels straight, even sides and cut the ends into angled points.
A more advanced technique you can try, if you have a quality sharp knife) is to cut the peel from one end to the other in a smooth, curving motion.
This produces a peel that has tapered points at either end and a gently rounded appearance, sort of like the shape of a leaf. I use this trimming method all the time, especially when making carved peels.


How to make a long twist with a channel knife
Another handy garnish tool is the channel knife. This peeler allows you to remove a long skinny piece of citrus peel.
This type of peel is especially suited to elegant bubbly drinks like the French 75, or drinks that specifically call for a super long twist, like the Horse's Neck.
Starting at the top of your fruit, press the channel knife into the skin and carefully pull it along the surface, traveling around the circumference of the fruit.
With a little luck, you can remove one long peel that uses nearly all of the fruit's peel. But its ok if it's only a few inches long, too.


Now, wrap the long peel around an object like a chopstick or a pencil to create a twist shape.
When I'm prepping drinks, I like to make my twists first and set them aside with another object (like a peeler or knife) gently applying pressure and keeping them wound tightly on the chopstick. This helps the twist to retain the coiled shape for longer.


How to cut a twist to sit on the edge of a glass
Remove a piece of citrus peel with a knife or vegetable peeler and trim it how you like.
Now, cut a slit in the center of the peel, lengthwise (see photo below). The length of the slit should be about an inch so that the peel will fit onto the rim of a glass.
Keep in mind the opening may need to be a little bit longer if your glass has a thick edge.


Next, wrap your peel around a chopstick to set the twist shape. Once the peel is shaped into a twist, you can place it onto the rim of your glass, using the center slit to anchor it (see photo below).


How to create an orange peel heart on a cocktail pick
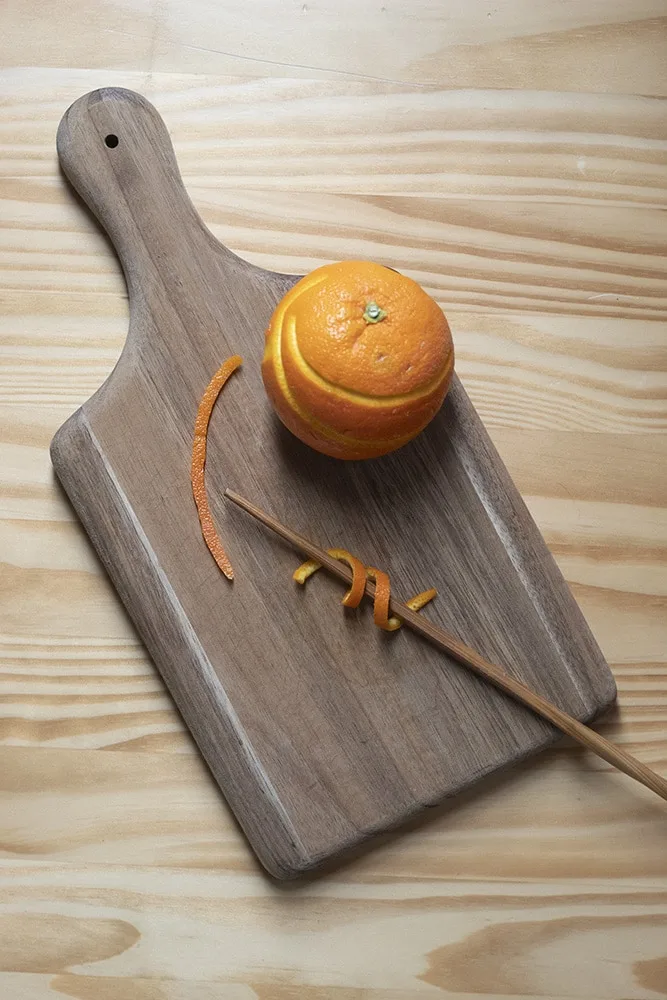
This is one of the cutest peel garnishes and it's not at all difficult to learn! Start by peeling a long (about 4 or 5 inch) piece of peel.
Trim the peel so that it's long and narrow, then carefully cut the peel down the middle, stopping about ¾ of an inch before the end (see photo below).
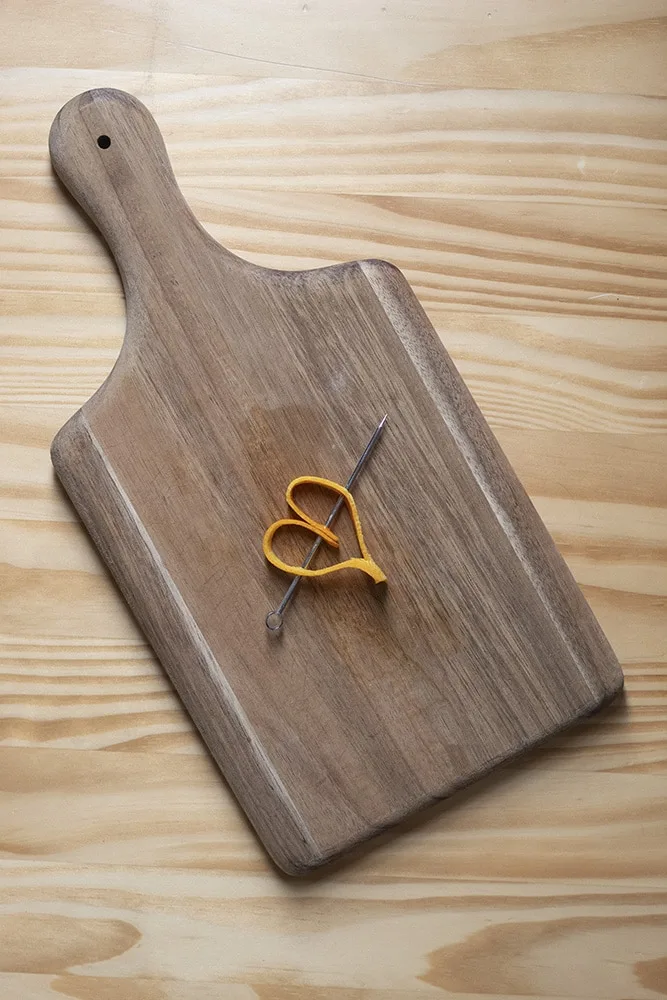
As you can see from my photos, it doesn't have to be perfect! I didn't cut a straight line, but the finished heart still worked just fine and looked great.


Now you'll have a skinny peel with two long flaps. Take each flap and fold them in towards the base of the peel, stopping a little before the base, forming the shape of a heart. Carefully turn the heart on its side and gently press the citrus layers flat in order to skewer it with a cocktail pick. The pick will secure the shape in place and now you can adorn your cocktail with an adorable orange peel heart!


How to make a fancy citrus peel fan garnish
I first saw this awesome style of citrus garnish on the Instagram of Matt @theamateurmixologist. If you enjoy cocktails and incredible garnishes, you're probably already following him.
This gorgeous garnish is not very difficult, but adds a whole lot of visual flair to classics like the White Lady. Start by trimming a peel to have a flat end at the bottom and sloping point at the other (see photo below).


Next, carefully cut a few vertical (3-5, or more) slits, ending about ⅓ of the way to the end of the peel.
You want to leave enough uncut peel that you have a sturdy base, which will sit on the edge of the glass (see second photo below).


Now, cut a vertical slit about 1 inch long in the center of the uncut base of the peel. This slit will let the fan sit on the rim of the glass.
This garnish is particularly dramatic because once perched on the glass, the top segments of the peel fan out beautifully (see photo below).


How to make a citrus peel rosette garnish
This is one of my favorite citrus garnishes, and one of the first I learned how to make.
The only hard part here is being able to cut one super long piece of peel.
I like to use a Y-shaped vegetable peeler to accomplish this, starting at the top of the orange and working my way down along the circumference of the fruit.
It's ok if the peel breaks off at some point, just so long as it's long enough to roll up.


All you have to do now is roll the long peel up tightly and skewer it with a cocktail pick to secure it in place!
This garnish is quick, fairly easy, and beautifully aromatic since it uses so much of the peel.


How to make carved citrus peel garnishes
I started making these crazy ornate carved leaf-looking peel garnishes in 2018 because I was pretty terrible at making more standard peel garnishes.
As you can see from most of the photos in this tutorial, I'm really not very skilled when it comes to making those perfect twists that pro bartenders make look so easy.
So, naturally I started overcompensating by making over-the-top creative carvings like this bad boy below.

The best part of these garnishes is that it's a chance to get really creative and make a visually memorable drink (which is helpful for us internet drink makers sharing recipes on Instagram and Pinterest).
If you're looking for ways to improve your Instagram cocktail photos, you might like my 5 Tips for Better Instagram Cocktail Photos.
I was first inspired to get into this kind of fruit carving after watching some amazing carving videos on Youtube, like this butterfly garnish by Sucre and Sweet.
It's very helpful if you have one of those special carving knives that looks like a pen, but as you can see in the pictures below, it's not necessary.
My citrus carving knife is a cheapo small paring knife that I picked up in a pack of 5 at Walmart.
My secret is that I dulled the knife's edge to the point that it wouldn't cut anything, and then I selectively sharpen just the very tip of the blade so that it's ultra-sharp.
This lets me hold the knife like a pencil, giving me a lot of control and letting me cut curved shapes easily.
Please use caution and common sense when working with any knife! A super sharpened knife is very dangerous and should be handled with care and stored away from your regular household knives and silverware.
I keep my garnish knives in a separate tall jar with my bar tools, out of reach from little hands and accident-prone husbands.
The basic carved leaf garnish, step by step
Begin by peeling a fairly long strip of citrus peel.
Next, trim the peel into a basic leaf shape by cutting vertically, from end to end, in a gradual curve that leaves you with two pointed ends.
Now use a sharp knife to carefully remove slightly curved triangular pieces along the edge, creating a natural-looking edge (see photo below).
The slightly curved lines are what make this peel stand out, but you can also just cut out straight-edged triangles along the edge, giving it a sharp, spiky look.
I find that I'm only very good at cutting these in one direction, so I flip the peel over to cut the second edge (see second photo).


From here, you can continue to carve, if you like, removing from the interior of the peel like in the image below.
Once you start carving peels like this and getting more intricate with your designs, you'll immediately notice that they become super flimsy the more you carve away.
Here's the secret to a sturdy, easy to carve peel
Rather than using a knife or peeler to remove a thin piece of the skin, remove an entire section of the rind (including the pith), as though you were peeling the fruit to eat it.
This gives you a larger piece of peel and it's also very thick. Turn the section over and carefully shave down the white pith so that it's more manageable, but leave enough so that the peel won't become floppy as you carve.

This technique is especially helpful when trying to carve lime peels, which can be trickier than larger fruits.
Below are a few more examples of carvings to give you some ideas. I hope you've enjoyed this guide and it helps you create more fabulous citrus peel garnishes!
If you enjoyed these garnishes, try the skewered rosette variation in the tutorial video!
As always, be sure to tag me @moodymixologist on Instagram if you try these techniques! Subscribe to my weekly email for more cocktail, mocktail, and garnish content delivered right to your inbox!


Jennifer
Monday 31st of October 2022
These are absolutely beautiful. Question...how far in advance can I make the garnishes? Can I make them in the afternoon and refrigerate them? Will they still look nice by the evening?
Amy
Wednesday 9th of November 2022
Hi Jennifer! You can make them a couple hours in advance and wrap them in a damp paper towel and keep them in the fridge. The hard part is keeping them from drying out.
Sharon Benton
Saturday 28th of August 2021
Thank you for posting this! Your work is so inspiring and gorgeous! Can't wait to try out some of these garnishes myself.
Amy
Saturday 28th of August 2021
Thanks so much Sharon!
Dennis
Tuesday 28th of April 2020
You are truly an amazing artist ⭐️⭐️⭐️
Jenn
Monday 27th of April 2020
These are gorgeous! Thank you so much for the tutorial - I am definitely bookmarking this page to come back to! I am pretty happy with my drink-making skills but have a WAY to go on my garnish game. Cheers!