
The garnish is an important (and fun!) part of the cocktail making and drinking experience. From cutting citrus into beautiful wheels and wedges to skewering berries, cherries, and olives, you’ll learn how to master all of the basic cocktail garnishes in this guide.
What is a garnish?
A cocktail garnish has two roles: decoration and flavor enhancement. While all garnishes add some visual appeal, many also add flavor or aroma to the drink.
Some cocktails taste quite different without the garnish (like a classic Mai Tai without mint, or an Old Fashioned without an orange twist). Don’t skip the garnish, it will greatly improve your homemade craft cocktails.
For more about garnishes and the role they play in the cocktail drinking experience, visit my Art of the Cocktail Garnish.

Essential garnish tools
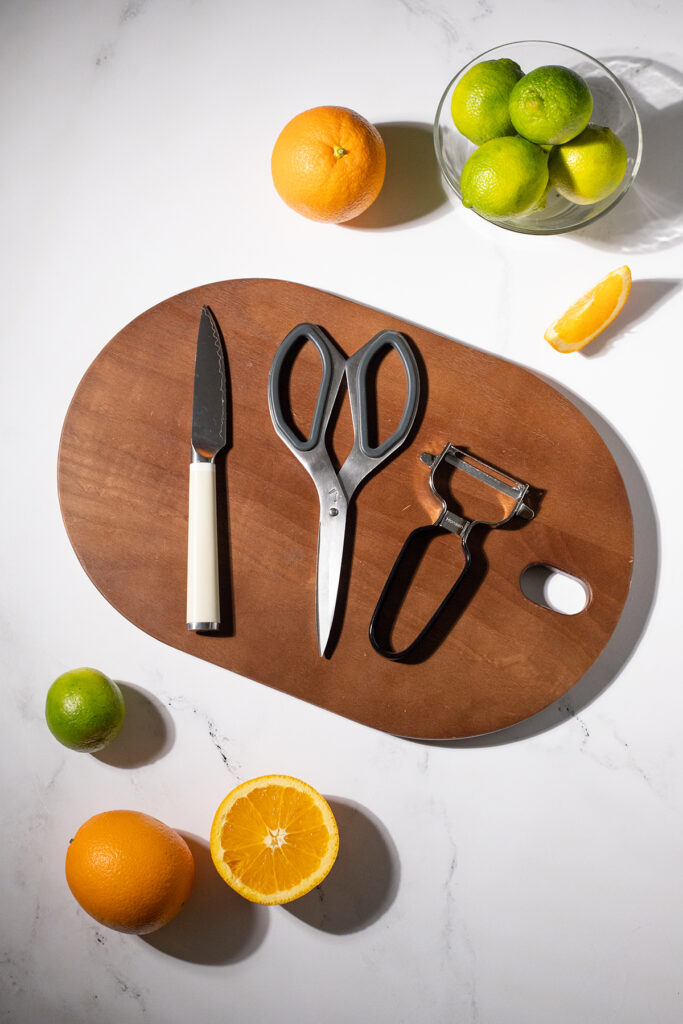
To make garnishes, you’ll need a nice sharp paring knife. This is the only crucial tool for making cocktail garnishes, but you can make things a lot easier by adding a pair of kitchen scissors and a Y-shaped vegetable peeler to your arsenal.
Learn more in about the Essential Tools for Home Bartenders.
I use The Almost 4” Knife and The Good Shears from Material Kitchen (pictured above). These tools were gifted to me and they’ve become my top picks over time because they’re super sharp and great quality. I highly recommend investing once in quality tools, rather than having to keep buying new, cheap tools over and over again.
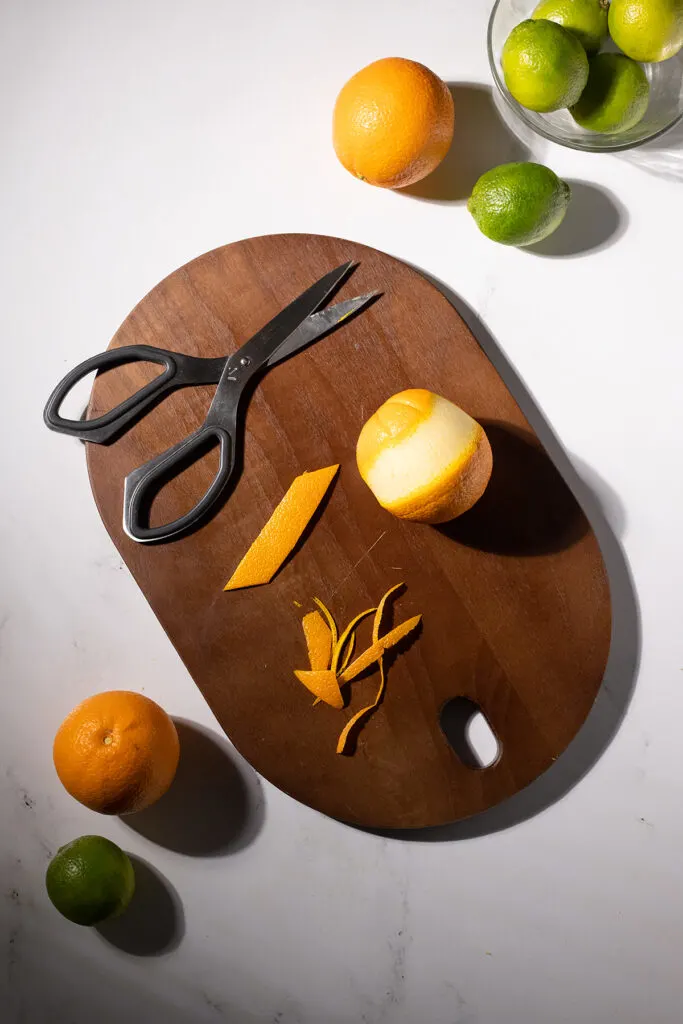
When making citrus peel garnishes, it can be easier to manipulate the shape of the peel when trimming it with scissors (rather than a knife). Use a pair of sharp kitchen shears to quickly remove rough edges and cut the peel into a nicely defined rectangle or other shape.
I have gone through a ton of vegetable peelers over the years and my top choices that are good quality, sharp, and economical are the Kuhn Rikon Original Swiss Peelers and the Honsen Ultra Sharp Stainless Steel Peeler (pictured above).
A Y-shaped vegetable peeler makes quick work of peeling citrus fruits and it’s a lot less dangerous than using a knife. If your knife skills are lacking or you’re accident prone, get yourself a peeler! They’re inexpensive and well worth the smooth, thin, evenly cut peels.

How to cut citrus garnishes
The most common cocktail garnishes use fresh citrus like lemons, limes, or oranges. Citrus fruits add zesty, bright aromas and flavors which can enhance the overall freshness of a drink as well as increase the perception of sweetness.
Learn more about how flavors balance each other in my discussion of the 8 tastes! There are four primary citrus garnishes and we’ll walk through how to cut and use each.
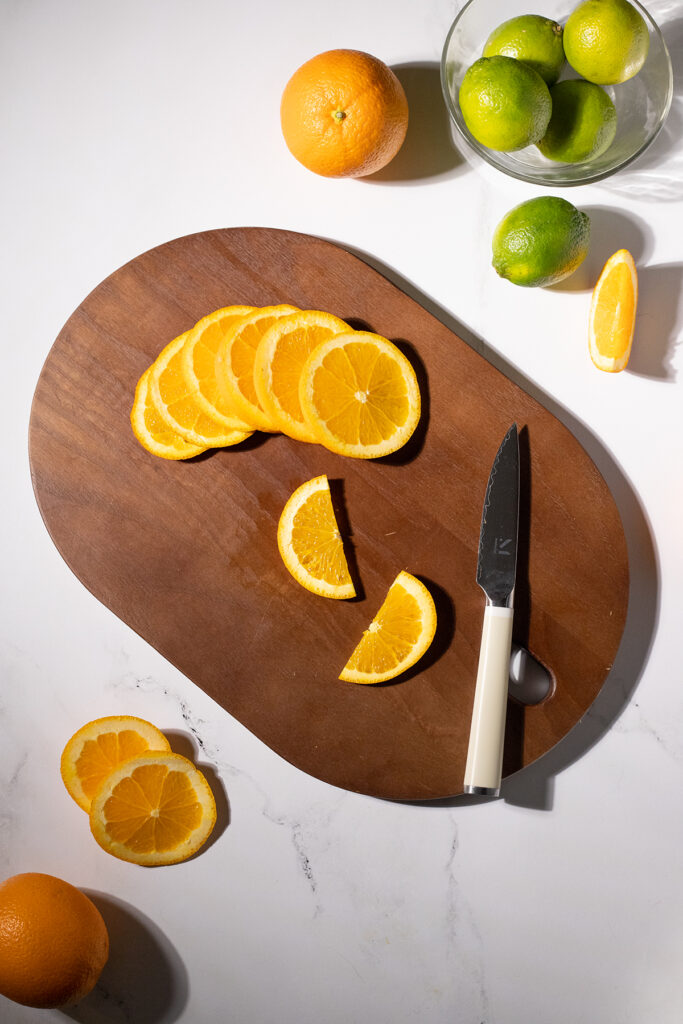
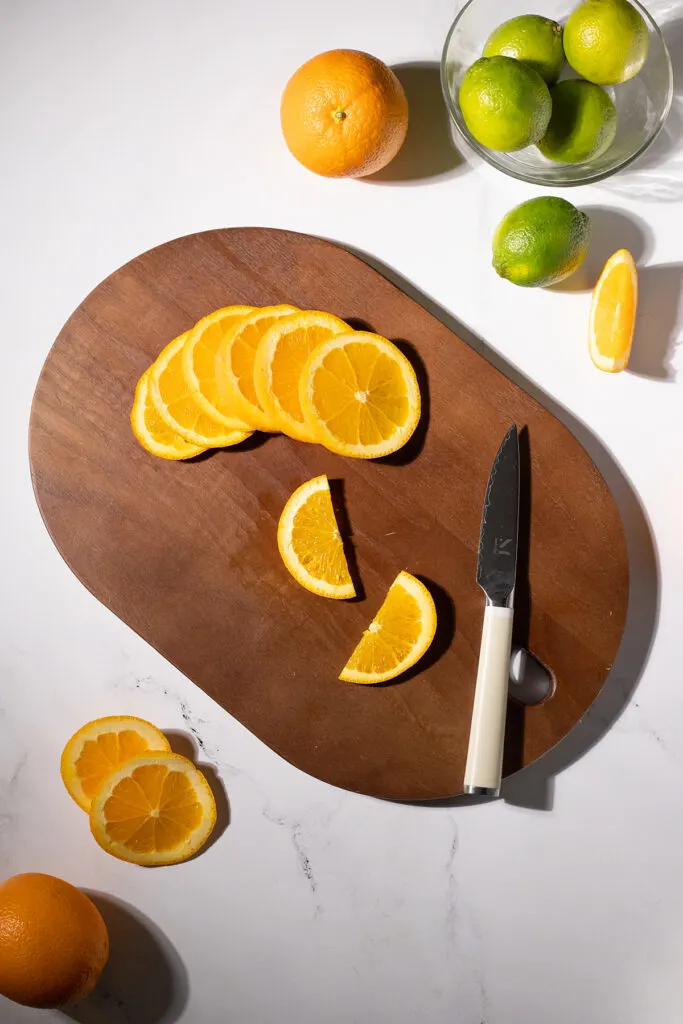
Citrus wheels
The citrus wheel is the simplest to cut and it always looks beautiful in a glass or placed on the rim. Wheels add aroma from the oils in the peel and a bit of juicy flavor from the flesh of the fruit.


To cut a citrus wheel, hold the fruit by one end (the base or the top) and slice straight through the middle of the fruit. You’ll now have two halves, each exposing the circular, wheel-like shape of the interior of the fruit.
Now, hold each half by its end and cut them into several sections, each about ¼” thick. An average-sized orange will yield about 6-8 perfectly shaped wheels and a few small ones from each end that are less attractive.
To sit a citrus wheel on the rim of a glass, cut a slit from one edge of the wheel into its center. Be careful not to cut it all the way through to the other side. Now place the wheel slit-side down onto the edge of the glass.
Citrus slices
A citrus slice is incredibly simple to master once you know how to cut a wheel. Simply cut each wheel in half and you’ll have two slices!
Citrus slices add a bit of juicy citrus flavor to your drink but in a smaller package than a wheel. These garnishes are easy to sit on the rim of a glass and they don’t get in the way of sipping.
To secure a slice on the edge of your glass, cut a slit into the flesh side of the slice, being careful not to cut all the way through to the peel. Place the slice slit-side down onto the rim of the glass.
Citrus wedges, two ways
Citrus wedges are very common garnishes in drinks like Margaritas or Gin and Tonics. A wedge lets the drinker squeeze a little of that crisp lime or lemon flavor into their drink, customizing the level of acidity.
There are two ways to cut citrus wedges. The first method is the most common, the second makes for a fancier-looking wedge. Both methods will yield about the same number of wedges, so it all comes down to which look you prefer.


Wedge style number one exposes the smooth interior sections of the fruit, rather than the triangular segments separated by pith in style number two. Both methods require a little trimming of the ends.
For the first wedge method, hold the fruit vertically and cut through the middle, from one pole to the other. This is opposite of the way we cut a fruit for citrus wheels. You’ll see the curved, half-moon segments of fruit on the inside.
Next, remove the pithy part from the top and bottom of each half. Now cut out the thick center pith by slicing down and at a slight angle on each side of the pith. Don’t cut all the way through, just about ¼ inch into the fruit will do the trick.
Hold each half by the rounded side of the fruit (trimmed ends pointing towards and away from you), and slice each into four wedges.
To place a wedge on the rim of a glass, cut a slit into the flesh side of the wedge, being careful not to cut all the way to the peel. Use the slit to securely position the wedge in the glass.


For citrus wedge style number two, hold the fruit by one end, like you’re cutting wheels. Slice the fruit in half, then cut each half in half. You’ll see that one wedge from each half has an attractive side and a side with a lot of pith from the end/pole of the fruit. Carefully trim off the excess pith from those two end wedges.
You’ll have four beautifully segmented wedges from each side of the citrus. This style of wedge cutting is perfect when you want smaller citrus wedges. Use this method to cut small lime wedges that can be popped inside bottles of Mexican beers.
Citrus twists
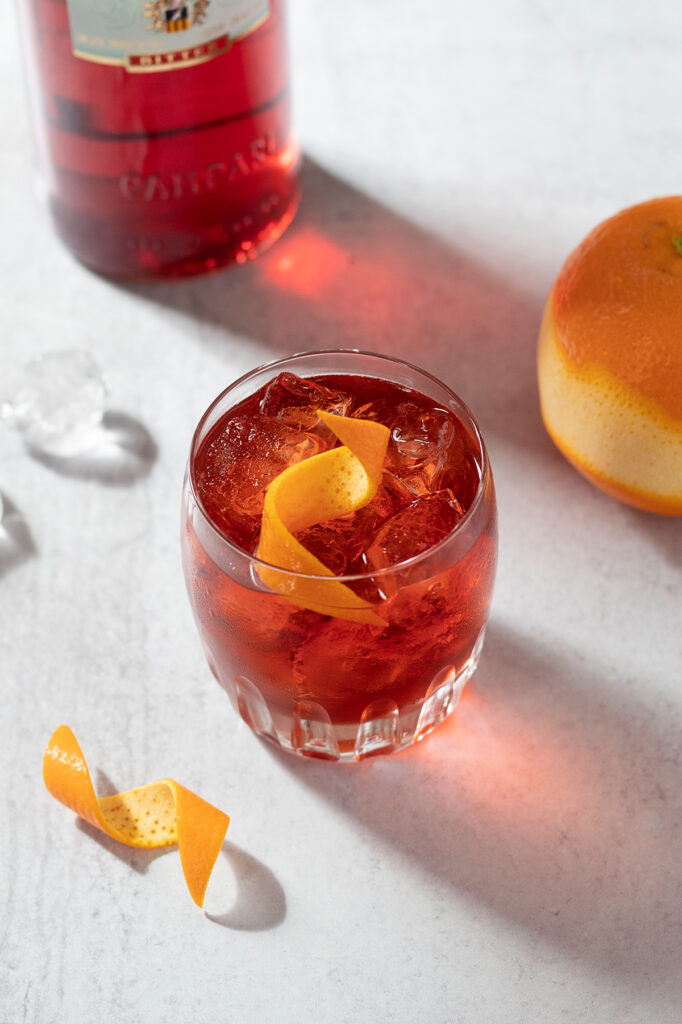
Citrus twists are the most common garnish for classic and spirit-forward cocktails like the Negroni and the Martini.
The oils from the peel when it’s twisted and expressed over the surface of the drink add flavor and aroma that can greatly enhance the flavors of the spirits. Citrus twists are one cocktail garnish that should never be skipped, as the finished drink will taste dramatically different without it.
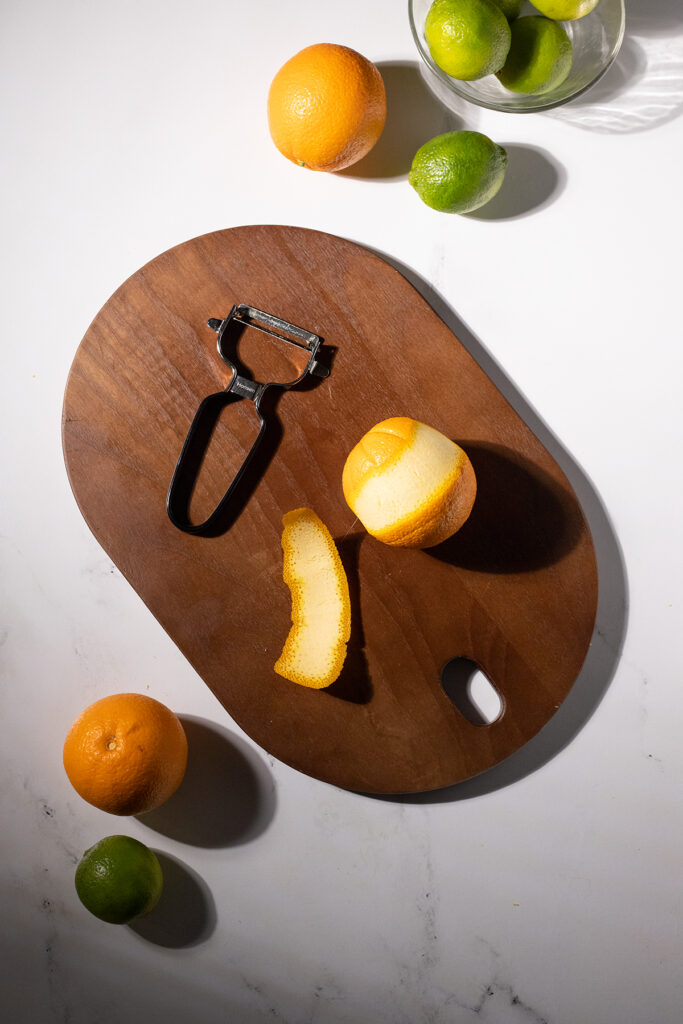
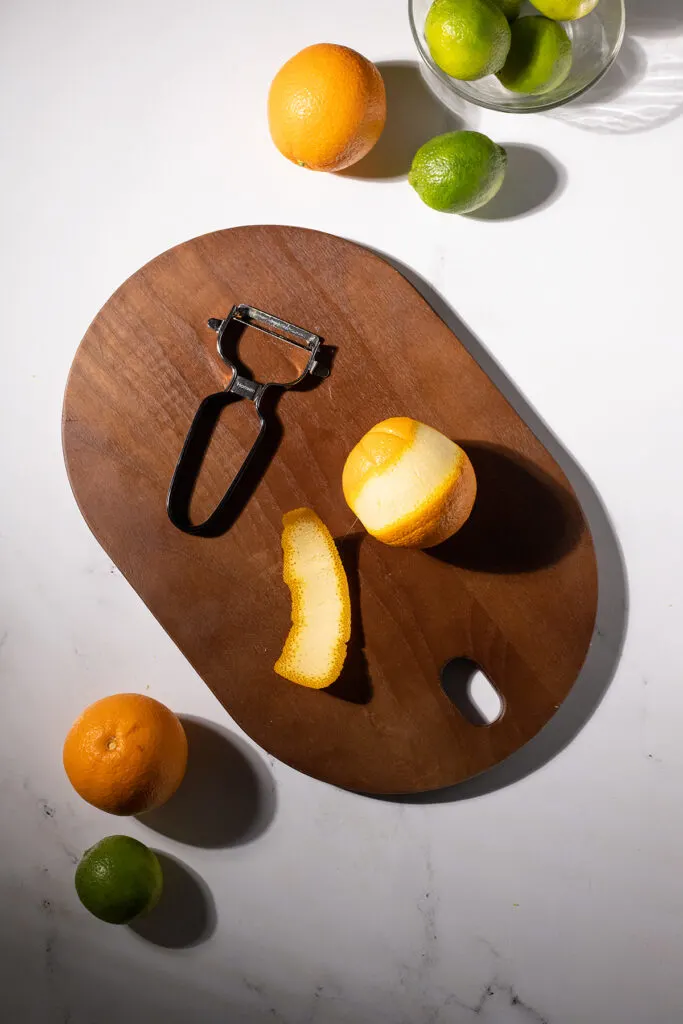
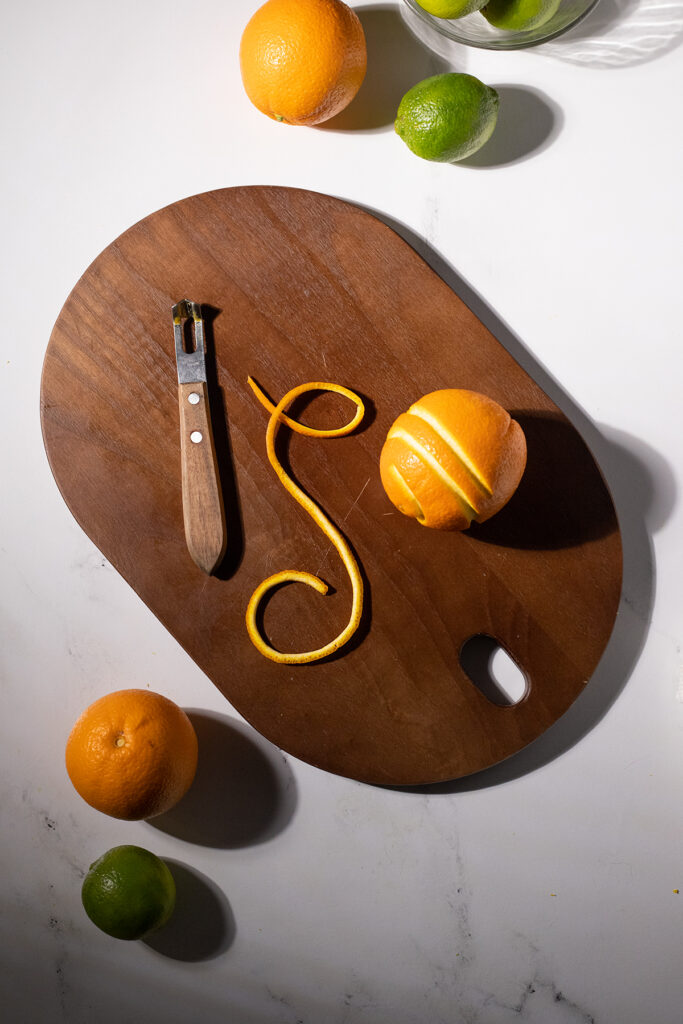
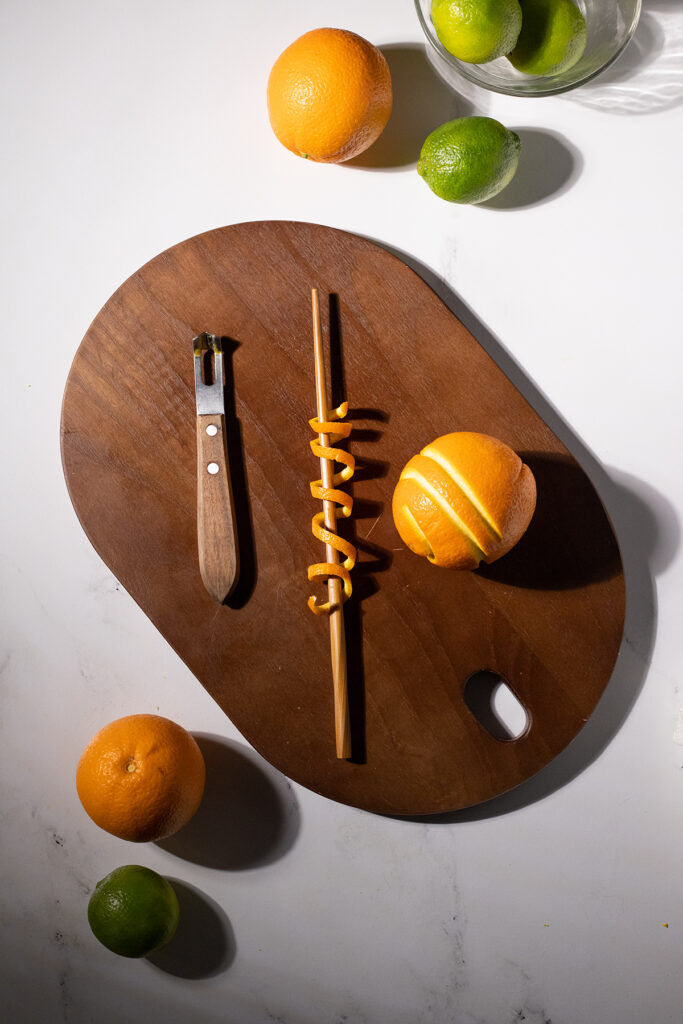
To make a citrus twist, use a paring knife or a vegetable peeler to remove a long, wide swath of peel. Try not to take too much pith with the peel if you’ll be placing the peel in the drink. Citrus pith can impart a bitter flavor to the drink.
Next use your kitchen shears or paring knife to trim the edges of the peel into a rectangle or give the peel a fancier look with angled, pointed ends.

At this point, your citrus peel is ready to use. Twist it (or fold the edges back towards yourself) while holding it over the glass, peel facing the drink, and watch as the oils spray from the peel. Run the expressed peel along the rim of the glass for even more flavor and citrus scent.
You can discard your peel, place it in the drink, or place it on the rim of the glass. A nice way to enhance the look of your twist is to use a chopstick (or bar spoon handle or similar-shaped object) and literally twist the peel around it. If you place it on the stick like this for a minute or two, it will hold its spiral shape for a surprisingly long time.


To place a twist on the rim of a glass, cut a slit about an inch and a half long in the center of the peel, lengthwise. Use the slit to sit the twist on the edge of the glass. Find more citrus twist garnish ideas in my Guide to Citrus Peel Garnishes.
More advanced citrus garnish tools and techniques
The following garnishes are a tiny bit more advanced simply because they require special tools. A channel knife is easy to find on Amazon, such as this one I use by Viski. Pinking shears can be found online or even at craft stores like Michael's.
Channel knife for an elegant citrus twist
Another way to make a citrus twist is to use a channel knife. This specialty tool lets you easily remove a very long, skinny piece of citrus peel. You can then shape the peel with a chopstick, just like in the method above. This will give you a long, curly, elegant peel that’s great for garnishing champagne cocktails like the French 75.


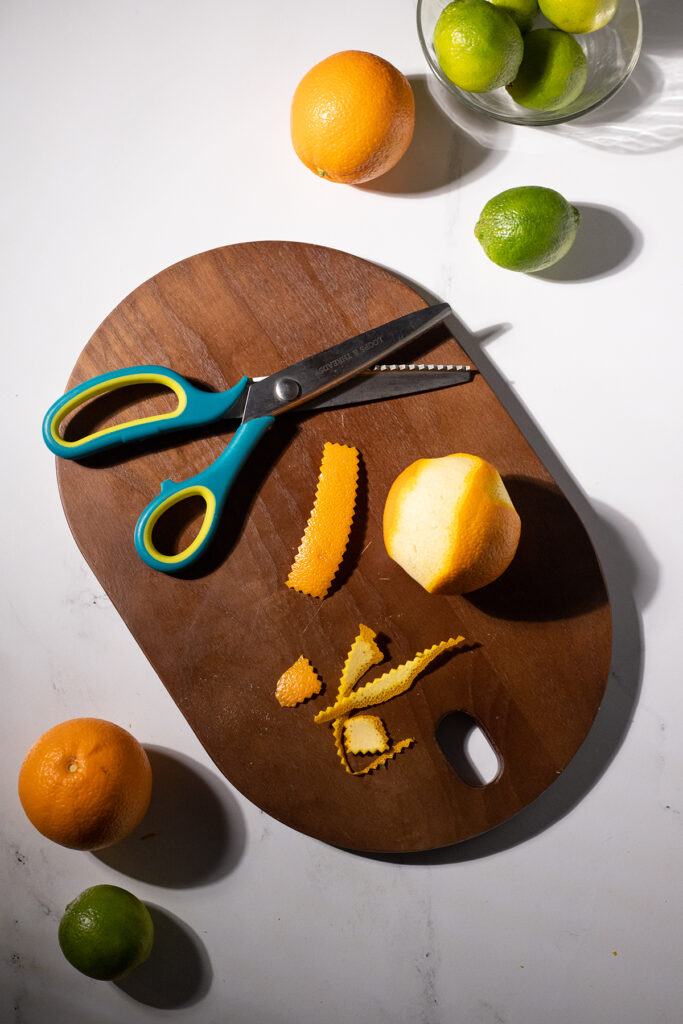
Pinking shears for a zigzag edge
Pinking shears are used in sewing and crafts to add a neat, zigzagged edge to fabrics. And they can also be used to quickly trim citrus peels, giving them a very fancy look.
Simply remove a piece of peel with your paring knife or kitchen scissors, then trim each rough edge of the peel with the pinking shears. Be careful to line up each cut so that the zigzags match perfectly. That’s it! Pinking shears make your citrus peel garnishes look professional in just seconds, no knife skills required.

How to garnish with herbs
Many cocktails are garnished with fresh herbs, like mint, rosemary, basil, or thyme. For the best look and aroma, use super fresh herbs, and when it comes to mint, don’t be afraid to garnish abundantly! Tiki cocktails are often garnished with mint for its cool, fresh aroma, which lightens up blends of aged rums, tropical syrups, and spices.
When garnishing with herbs, give them a gentle clap between your hands or a slap on the back of one hand before placing them in the drink. This gentle “spanking” of the herb releases some of the plant’s essential oils, making them fragrant.


Herbs can be placed directly in the drink or clipped to the side of the glass with a mini clothespin. Some bartenders aren’t a fan of the tiny clothespins, but for my home bar and my personal enjoyment, I find them to be very useful. Clipping a garnish to the glass allows you to enjoy the aroma of the herb or citrus peel without it sinking into your drink.
How to use a cocktail pick
Cocktail picks make it easy to garnish with cocktail cherries, olives, berries, and many other fruits or vegetables. Simply skewer your desired garnish with the pointed end of the pick and place the garnish in your drink or along the rim of the glass.


While you can certainly just drop an olive in a Martini or a cherry into a Manhattan, a cocktail pick lets you snack on the garnish before the glass is empty. It’s also just a more elegant way of consuming your garnish, even if you do wait until the glass is empty. Always use a pick if garnishing with more than one olive, cherry, or berry.
How many olives or cherries to garnish with
The general rule for garnishing is to use an odd number, such as one, three, or perhaps even five, if garnishing with something like raspberries or blueberries.
That being said, I like to garnish some drinks with two Luxardo cherries because I feel like one isn’t enough but three is one too many! When you're in the comfort of your own home, there really are no rules. Choose the number that you feel works best for your cocktail.


Skewered garnish examples
- Olives for Martinis
- Cocktail onions for a Gibson
- Cocktail cherries for Manhattans
- Raspberries for a Clover Club
- Blueberries for a Blueberry Ranch Water
- Blackberries for a Blackberry Hot Honey Margarita
- Strawberries for a Strawberry Negroni
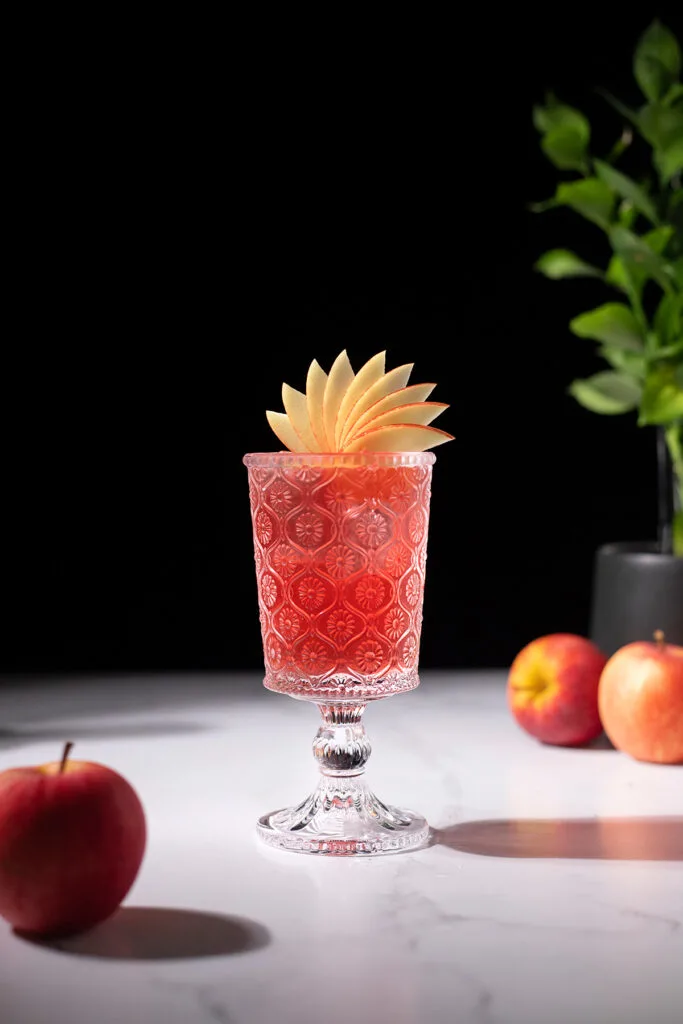
- Apple fan for a Jack Rose
- Peach fan for a Midnight Sunshine
- Cucumber ribbon for a Cucumber Basil Smash
- Watermelon for a Strawberry Watermelon Gin Cooler
- A citrus wheel and cherry “flag” in a Hurricane
Learn how to make cucumber ribbons, apple fans, and herb and fruit skewers in my 5 Easy (and Beautiful) Garnishes guide.


How to Garnish Cocktails (for Beginners)
Equipment
- Sharp paring knife
- Kitchen shears
- Y-shaped vegetable peeler
- Pinking shears
- Channel knife
Materials
- 1 medium orange, lemon, or lime
Instructions
Citrus Wheels:
- Hold the fruit by one end (the base or the top) and slice straight through the middle of the fruit. You’ll now have two halves, each exposing the circular, wheel-like shape of the interior of the fruit.
- Now, hold each half by its end and cut them into several sections, each about ¼” thick. An average-sized orange will yield about 6-8 perfectly shaped wheels and a few small ones from each end.
- To sit a citrus wheel on the rim of a glass, cut a slit from one edge of the wheel into its center. Be careful not to cut it all the way through to the other side. Now place the wheel slit-side down onto the edge of the glass.
Citrus Slices:
- A citrus slice is incredibly simple to master once you know how to cut a wheel. Simply cut each wheel in half and you’ll have two slices!
- To secure a slice on the edge of your glass, cut a slit into the flesh side of the slice, being careful not to cut all the way through to the peel. Place the slice slit-side down onto the rim of the glass.
Citrus Wedges (Method 1, Simple Style):
- Hold the fruit vertically and cut through the middle, from one pole to the other. This is opposite of the way we cut a fruit for citrus wheels. You’ll see the curved, half-moon segments of fruit on the inside.
- Next, remove the top and bottom of each half. Now cut out the thick center pith by slicing down and at a slight angle on each side of the pith. Don’t cut all the way through, just about ¼ inch into the fruit will do the trick.
- Hold each half by the rounded side of the fruit (trimmed ends pointing towards and away from you), and slice each into four wedges.
- To place a wedge on the rim of a glass, cut a slit into the flesh side of the wedge, being careful not to cut all the way to the peel. Use the slit to securely position the wedge in the glass.
Citrus Wedges (Method 2, Fancy Style):
- For citrus wedge style number two, hold the fruit by one end, like you’re cutting wheels. Slice the fruit in half, then cut each half in half again.
- You’ll see that one wedge from each half has an attractive side and a side with a lot of pith from the end/pole of the fruit. Carefully trim off the excess pith from those two wedges.
- You’ll have four beautifully segmented wedges from each side of the citrus. This style of wedge cutting is perfect when you want smaller citrus wedges. Use this method to cut small lime wedges that can be popped inside bottles of Mexican beers.
Citrus Twists:
- Use a paring knife or a vegetable peeler to remove a long, wide swath of peel. Try not to take too much pith with the peel if you’ll be placing the peel in the drink.
- Next use your kitchen shears or paring knife to trim the edges of the peel into a rectangle or give the peel a fancier look with angled, pointed ends.
- At this point, your citrus peel is ready to use. Twist it (or fold the edges back towards yourself) while holding it over the glass, peel facing the drink, and watch as the oils spray from the peel. Run the expressed peel along the rim of the glass for even more flavor and citrus scent.
- You can discard your peel, place it in the drink, or place it on the rim of the glass. A nice way to enhance the look of your twist is to use a chopstick (or bar spoon handle or similar-shaped object) and literally twist the peel around it. If you place it on the stick like this for a minute or two, it will hold its spiral shape for a surprisingly long time.
- To place a twist on the rim of a glass, cut a slit about an inch and a half long in the center of the peel, lengthwise. Use the slit to sit the twist on the edge of the glass.