
Last updated: February 9, 2021
This photo garnish guide will take you through five simple but beautiful cocktail garnishes that you can easily make at home, no matter your skill level.

We’ll cover how to create them, some pro tips for making them look perfect every time, as well as what kind of drinks go with each garnish.
Want to learn all about citrus twists and up those knife skills? Check out my Guide to Citrus Peel Garnishes. Total beginner? Head to How to Make Cocktail Garnishes (for Beginners).
Why do we garnish our cocktails?
Cocktail garnishes are the finishing touch that add something special to your drink. A good garnish can transform your cocktail from ordinary to downright Instagrammable.
Garnishes are meant to serve as a decoration on or in the glass, but they often serve a more important purpose by adding aroma or subtle flavors to your cocktail.
Don’t assume that a garnish specified in a cocktail recipe is optional! Garnishes like citrus twists or herbs can completely change the way the final drink tastes by affecting how it smells.
You can learn all about the purpose of garnishes and the many different kinds in my post The Art of the Cocktail Garnish.

The following five garnishes are easy to master, look impressive, and go beyond the simple lime wedge or olives on a cocktail pick you’re probably already familiar with.
These garnishes are also quick and inexpensive, making them ideal for the home bartender (especially during self-isolation!)
If you’ve ever wondered how bartenders and internet drink-makers make such cool cocktail garnishes, this tutorial will get you well on your way to making plenty of your own!
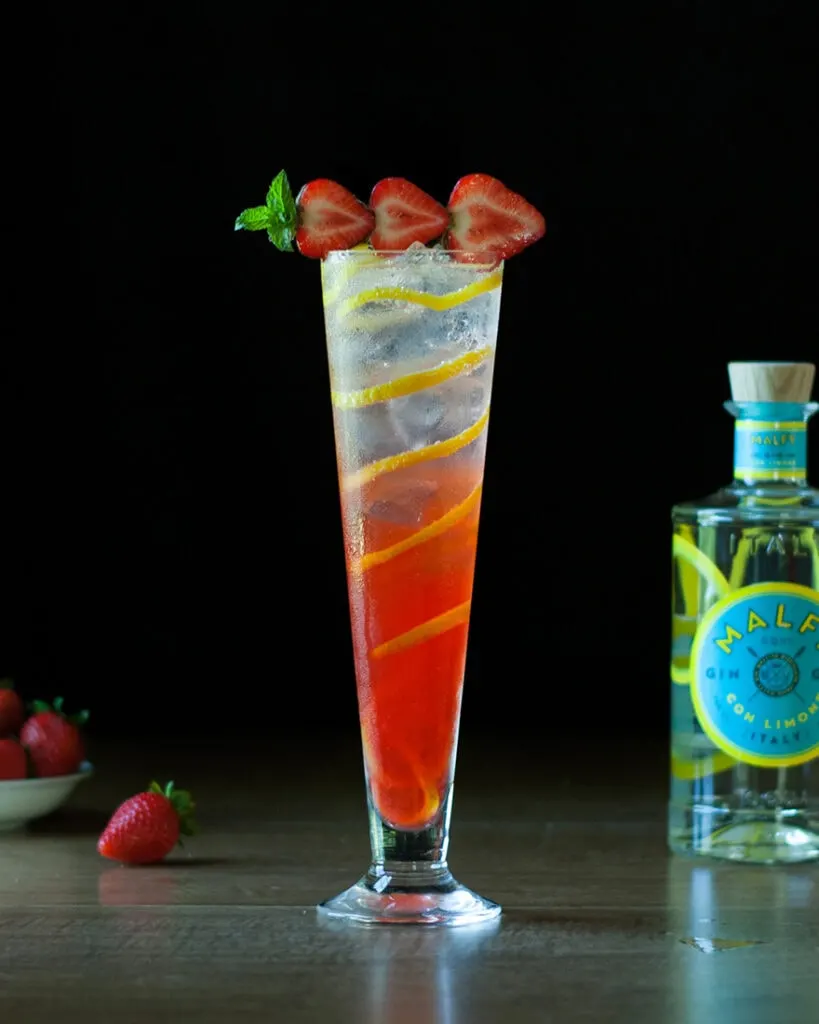
Berry & Herb Skewer

Let’s start with a really easy one that is well-suited to a variety of botanical drinks and cocktails.
This berry and herb skewer gives your finished drink both a beautiful fresh herb aroma and a tasty little snack.
Berry & herb pairing ideas
Berries and herbs are a natural combination and I’ve found that most herbs go really well with most berries, but this short list offers some of the most common pairings.
Lately I’ve been making lemonade with muddled raspberries and basil, so that inspired this particular skewer. Other combinations to try are:
- Strawberry + basil
- Raspberry + mint
- Blueberry + thyme
- Blackberry + sage
Supplies:
- Berries of choice
- Fresh herb of choice
- A cocktail pick

How to make the garnish:
Begin by selecting your berries. You want fruit that is still firm, but ripe, and the right size for your cocktail pick.
Strawberries, for example, can sometimes be enormous, so choose ones that are small enough to fit your skewer and your drink. You can also slice strawberries in half to make them more manageable.
I actually prefer the look of halved strawberries, showcasing their pretty pink and white interiors - plus two halves often fit perfectly on a pick.
Choose your herbs. For herbs like mint or basil, pluck a top section of the stem with leaves that form a nice-looking little bouquet.
You’ll want enough stem that you can stick it into your top-most berry, so don’t skimp if cutting fresh from a plant.
Use your cocktail pick to create a hole for the herb stem to stick into. This will secure the herb to the berries, and then you’ll secure the berries by skewering them onto the pick.
With a very soft berry like raspberries, you can probably just plunge the herb stem directly into the berry without having to make an indentation first.
Plunge the stem of your herb top into the berry, then skewer the berry with a cocktail pick and continue adding berries to the pick until it’s filled or it looks right.
A common rule of thumb for garnishes like berries, olives, or cherries is to use an odd number (1 or 3… 5!), but there are no rules when you’re fixing a drink for yourself at home. Do you! I like to fill an entire cocktail pick with blueberries sometimes, and I’m not ashamed to admit it.
PRO TIP: Consider what direction you want your berries to face once skewered. When using raspberries, like in the images, I like to use three similar-sized berries and face the first and third berries away from the glass, and let the middle berry face up, at the drinker.
A slight visual variation like this can make the garnish look even more appealing (especially important if you want to snap a great picture of your drink).
Now that your berry and herb skewer garnish is complete, place it into or across your cocktail glass, and enjoy!

What cocktails pair well with a berry and herb garnish?
Here are some simple ideas for classic and custom drinks to pair this garnish with. It’s especially great with gin cocktails and it’s fun to match the herb with your gin’s botanical profile.
- Gin & Tonic
- Vodka Soda
- Tom Collins
- Daiquiri with muddled berries or berry syrup (match the berries muddled in the Daiquiri with the garnish)
- Basil Gin Smash (or this mocktail version)
Fancy Pineapple Fronds

This garnish is another incredibly easy one, possibly the easiest there is! Pineapple fronds add a tropical appeal to many cocktails, from complex tiki drinks to a basic Pina Colada.
Disclosure: This post contains Amazon affiliate links. As an Amazon Associate, I earn from qualifying purchases. Learn more.
Supplies:
- A fresh pineapple with nice-looking/uncrushed leaves
- Sharp knife
- Pair of pinking shears (you can find these at craft stores or on Amazon)
How to make the garnish:
Choose two to three pineapple leaves that will fit nicely in your glass. You want to select leaves that are in good shape, not cracked or crushed.
I like to choose leaves that are similar in size, each one slightly smaller than the other for visual appeal. This garnish is non-edible - it’s all about looks here, so you want the leaves to be as fresh and green as possible.
Withered brown leaves are better off skipped altogether, so if you have a pineapple that’s a bit past its prime, you may want to opt for a pineapple wedge garnish instead.
Pluck the leaves from the pineapple, trim the white ends with a sharp knife or a pair of scissors, give them a good rinse, then pat dry.
Now you can use the fronds as-is, or you can make them extra fancy with the help of some pinking shears.
I picked up a pair of these zig-zag cutting scissors at a craft store and they’re a fun tool for making all kinds of garnishes (try trimming an orange peel with them!)
Simply cut along the edge of the pineapple leaf with the pinking shears, making sure to line up the zig-zag each time you need to make an additional cut.
You can opt to cut both sides of the leaf, or just one, as pictured. This simple technique takes a basic garnish and makes it look extra special.
PRO TIP: If you want to have pineapple fronds available for garnishing any time, do yourself a favor and pluck all of the best-looking leaves from your fresh pineapple.
Wash them, dry them, wrap them in a paper towel, and seal them in a zip-top freezer bag. You can keep the leaves in the freezer for months and pull a couple out whenever you need them!

What cocktails go with a fancy pineapple frond garnish?
Apple Fan

Apple fans are a beautiful edible garnish that takes just seconds to make.
You can make a fan like the one pictured here from apples, pears, peaches, apricots, nectarines, even plums, if they’re not too soft!
This type of garnish is a great option for any cocktail made with any of these fruits.
Supplies:
- An apple
- Sharp knife
- Cocktail pick
How to make the garnish:
Stand your apple upright on a cutting board and make a cut about ⅛” out from the stem, removing one half of the apple’s flesh without cutting into the core or seeds. You’ll have a nice “cheek” of fruit to work with.
Place the cut section of apple face down on the cutting board and turn it so that the part that was previously at the top of the apple (near the stem) is facing to either left or the right.
By making this half-turn before beginning to cut your fan pieces, you’ll get beautiful, sharply pointed slices, rather than ones with a rounded edge.
See the image below for examples of both. The apple piece on the left was cut the way it came off the fruit, while the one on the right was turned horizontally.
Trim each side of the apple piece so that you’re left with only the thickest middle section.
Now, thinly slice the flesh into three, five, or even more sections.
Keeping the sections side by side, use a cocktail pick to skewer the sections together.
You want to pierce them about half way between their middles and their ends so they’re stable once fanned out.
Now, gently fan out the sections and place the pick on your cocktail glass.


What cocktails go with an apple fan garnish?
- Jack Rose
- Bitter Apple Negroni
- Midnight Sunshine (a frozen peach & aquavit cocktail)
- Apple Martini
- First Frost
- Garden of Eden
- Fall-themed Old Fashioned
- Any cocktail involving apples or apple cider!
Cucumber Ribbon

A cucumber ribbon is a beautiful and elegant way to garnish with fresh cucumber.
This easy garnish can be wrapped around the inside of a glass, rolled up into a tight spiral, or folded like an accordion and skewered on a cocktail pick. Below I'll walk you through the accordion-style garnish.
Supplies:
- Cucumber (the longer the better, English cucumbers are great for this)
- Sharp knife
- Vegetable peeler (optional, but highly recommended)
- Cocktail pick
How to make the garnish:
Wash and pat dry your cucumber, then cut off the ends. Using a sharp knife or a vegetable peeler, begin to peel off thin layers of the cucumber.
The layer you'll want for your garnish is one that if a few layers deep and isn't too much of the outer skin.
Look for a nice wide layer that is mostly white, with a thin green edge. Once you hit the seeds in the center of the cucumber, you've gone too far. These hole-y seeded ribbons won't hold up once folded and skewered.
Now that you've selected a nice smooth ribbon of cucumber, gently fold it back and forth, as pictured, and pierce it down the middle of the stack of loops with a cocktail pick.
If your cucumber is not very long, you may want to use two sections of folded ribbon on the pick (that's what I did here).
PRO TIP: If your cucumber is narrow, you may only get one or two nice looking ribbons from each side that you peel.
Keep this in mind if planning this garnish for a party - you'll want to stock up on plenty of cucumbers and also plan a dish to use up all the excess cucumber (or maybe cucumber-infused vodka).

What cocktails go with a cucumber ribbon garnish?
- Gin & Tonic
- Cucumber Mint Vodka Soda
- Dragon Fruit Cucumber Limeade
- Aquavit & Tonic
- Any cocktail involving cucumber!
Fancy citrus twist

There are a TON of ways to fancy up a basic citrus twist, but this simple spiky one is popular, very impressive, and not very difficult to make.
Learn all about citrus twist garnishes and get more ideas for creative citrus cutting in my Guide to Citrus Peel Garnishes.
Check out the video for a tutorial on a simple variation on this spiky twist!
Supplies:
- Citrus fruit
- Sharp knife
- Y-shaped vegetable peeler (optional, but highly recommended)

How to make the garnish:
Choose the right piece of fruit. You’re looking for a lemon, lime, orange, or grapefruit with fairly smooth skin that doesn’t feel too rock hard or too soft and mushy.
Hard, bumpy fruits tend to be a bit dry and brittle, while soft, overripe fruits are often too oily, and become wet and floppy while you’re cutting.
Look for a nice plump piece of fruit that gives slightly when gently squeezed.
Using a sharp knife or a vegetable peeler (my personal preference) to remove a nice wide swath of peel.
You don’t want to take a ton of the white pith off with the peel, but you do need some in order for the peel to have enough stiffness to hold its shape.
Visualize the shape of a curvy leaf (see photo). Trim the peel, cutting from end to end, gently curving its edge and making a point at either end.
The wider the piece of citrus peel you begin with, the easier this will be. The more sweeping curve you can give your ends before they come to a point, the more dramatic your final twist will be.
Once you have a good shape, cut a vertical slit in the center of the peel, about 1” long. This slice will allow you to sit the finished twist on your glass.
Now it’s time to cut some fancy little spikes. Cut several lines from about an inch from each point, to the edge, tapering their length along the curve (see photo with black lines indicating cut lines).
Once you’ve made all of your cuts, gently wrap the twist around a chopstick or pencil to set its curved shape. Now you have a very fancy-looking citrus twist ready to be added to a coupe glass!


What cocktails go with a fancy citrus twist?
Way too many to list! Some very popular ones include:
- Negroni
- Martini
- Vieux Carre
- Sazerac
- Old Fashioneds like this Saffron Honey Rum Old Fashioned
I hope you enjoyed this garnish tutorial! If you make any of these garnishes, be sure to share them on Instagram and tag me @moodymixologist! I can't wait to see what you create!

