
Photographing cold drinks like cocktails can be challenging.
There are reflections, melting ice, and condensation to deal with, not to mention unforeseen lighting issues and wilting garnishes!
Fortunately, once you have an understanding of lighting and a few pro tricks up your sleeve, you’ll be able to instantly improve your drink photos!

This photography guide will take you step-by-step through the process I use for setting up, styling, and shooting drinks and cocktails.
I’m a photographer-turned-cocktail-blogger and these are some of my best tips for creating beautiful, eye-catching drink photos.
I should have called this 'how to photograph drinks like a pro - on a budget,' because that's exactly what I'm going to show you how to do.
From budget-friendly equipment recommendations, to hacks like using $3 pieces of foamboard to reflect or block light, or a $2 bag of ice to get the clear ice look, this guide will have you taking gorgeous photos without breaking the bank.
Whether you’re a beginner troubleshooting common issues like reflections, or a seasoned food photographer looking to up your game, this guide will give you actionable tips that you can start using right now.
Do I need a DSLR?
Most of the recommendations here can be applied to creating images with your phone’s camera, but if you’re serious about improving your drink photos, consider investing in a consumer-grade DSLR to start.
A professional grade camera isn’t a requirement to take quality photos for social media or a blog.
Just being able to manually adjust your camera’s settings and switch between lenses are photography game changers. Check out my beginner equipment recommendations at the bottom of this post.
If you’re shooting drinks for social media and short on time, check out my tips for taking better Instagram cocktail photos.
There’s a lot to talk about, so let’s start with what I consider the biggest takeaway. The secret to taking great photos of cold drinks is that at least
90% of the work is done before the ice hits the glass
Photographing cold drinks requires planning on a different level than shooting food or hot drinks. So before you dive in and start actually making the drinks, you want to work through the pre-pour checklist below. It might look like a lot, but it all becomes second nature over time.
Ok, so why do so much of the work beforehand? The reason this is so important is because time is not on your side once you pour a cold drink.

You’ll need to make most of the important decisions about your image ahead of time, because once the drinks are prepared, you have only minutes to capture them looking their best.
Cold drinks and fresh garnishes quickly melt and wilt and become wet and sloppy. Sloppy, wet drink photos aren’t very appealing, imo.
This guide is geared towards capturing real, cold beverages, rather than staging prop drinks.
Yes, you can use fake ice and room temperature liquids, but unless you’re a pro and using top of the line artificial ice, your images will likely look artificial, too.
Also, there’s something very special about the look of a freshly frosted-over glass, and that look is hard to fake. More about that when we get into Reflections below!

Drinks photography pre-pour checklist:
- Initial lighting setup
- Glassware & garnish selections
- Camera angle
- Refine the lighting
- Composition & styling
- Focus & depth of field
- Reflections
- Fill line
- Ice

Lighting for drinks & cocktails
The very first step is to set up (or get set up near) your lighting.
What kind of light is right for your drink? If you’re working with natural light, find an area with a lot of bright, indirect sunlight.
This will give you the best blank canvas to work with. I primarily shoot in what used to be my dining room because it has windows on two adjacent walls, letting me get both natural back and side lighting at the same time.
This can be very useful when I want to backlight a drink to give it that glowy look, but I still need some fill light to keep the drink from becoming silhouetted.
Having plenty of available light gives you more options, but one bright window will give you more than enough light to make beautiful images.
My go-to lighting for a basic cocktail photo would be side lighting from a single window. Place your table close to a window to get as much light as possible.
Tip: Use a sheer curtain or a diffusion panel to diffuse the sunlight. This will give a soft look to the shadows and prevent overexposed highlights.
About 80% of the cocktail photos on my Instagram were taken with natural light coming from one window next to the drink. These days however, I mostly shoot with studio lights and off camera flash like the Godox v1.


Studio lighting for drinks photography
Don’t have access to daylight when you want to shoot your drinks? Thankfully it’s easier than ever to buy and use photo lights.
When I was in college for photography, continuous lights were really not an option for still photography.
Your options back then were strobes or halogen, and halogen lights were hot, heavy and generally unpleasant. Strobes are great but they do require a little technical know-how.
Fortunately, LED continuous lighting options are plentiful today, and you can find inexpensive light kits on Amazon that include softboxes for that diffused, even lighting every food photographer loves.
To use these lights, you simply assemble them, attach the softboxes, and turn them on. No fussing, and no learning curve. Start with one light, and get used to controlling that key light before adding any additional lighting.
One light is often all you need! Just like using window light, I recommend starting with your light positioned to the side. For a natural look, you can start by angling the light so that it’s to the side and above, angled downward (like the sun).

If you want a bright white background and a glowy look, you can backlight the image by placing the softbox right up against your table and shooting straight into the light.
This will give you a clean, fully back-lit look. Just keep in mind that if this is your only light source, it will be hard to add a lot of props unless they’re transparent, like a mixing glass or a liquor bottle.
Glassware
The next consideration is glassware. What glass is going to work with this lighting and make the drink look its best? How do different glasses look in this setup?
The right type of glass depends on the specific cocktail or drink you’re making, but beyond glassware shapes, consider: the volume of the glass, its design, its height, and how it will look adjacent to any other props you’re including.
Pro tip: You can find beautiful vintage glassware at thrift shops like Goodwill for a few bucks a piece. Many of my favorite glasses were just $1!
Consider scale
For example, if you plan to shoot your drink next to a liquor bottle, think about how both elements will be arranged in the frame. Will you be able to get a good angle of the glass if you have to also include a very tall bottle?
Maybe a long stemmed glass would be a good choice, to balance the height of the bottle. This is an example of considering scale when composing your shot.
Find the best angle
In addition to scale, think about the best angle for your photograph.
Drinks often look best at a natural, 45 degree angle, as if you were seated at a table and viewing the drink in front of you. They also look great photographed head-on, at table level (so that the glass sits on the horizon line), and its shape is not distorted in any way.

If you’ve scrolled through one of my recipes here or follow me on Instagram, it’s pretty easy to see that the table level angle is my favorite for capturing cocktails. What can I say, I love to showcase the beauty of the glassware!

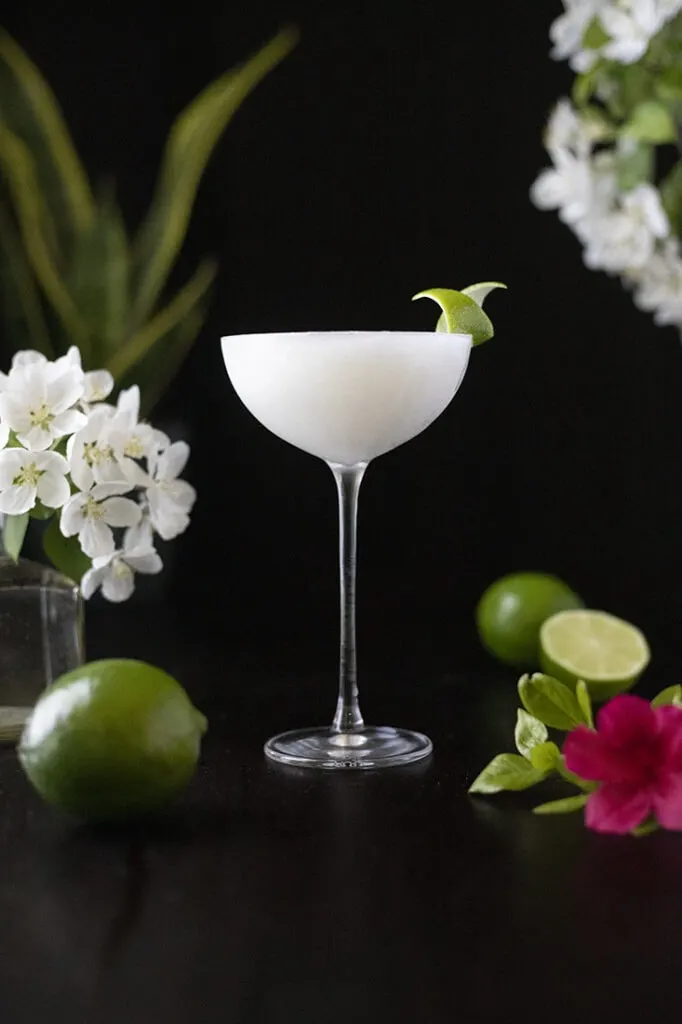
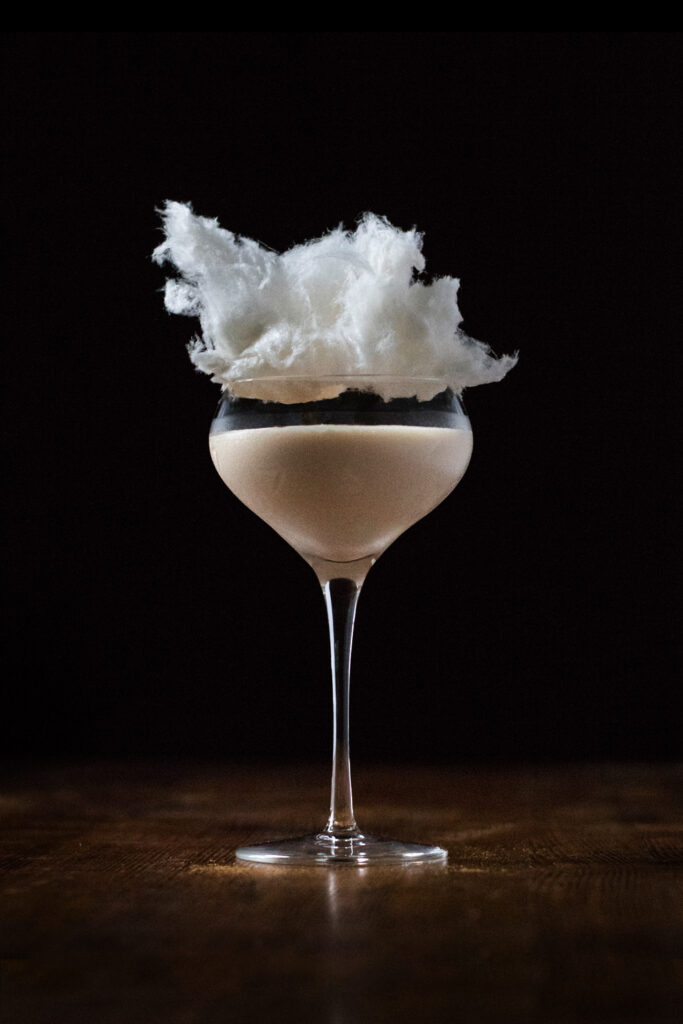
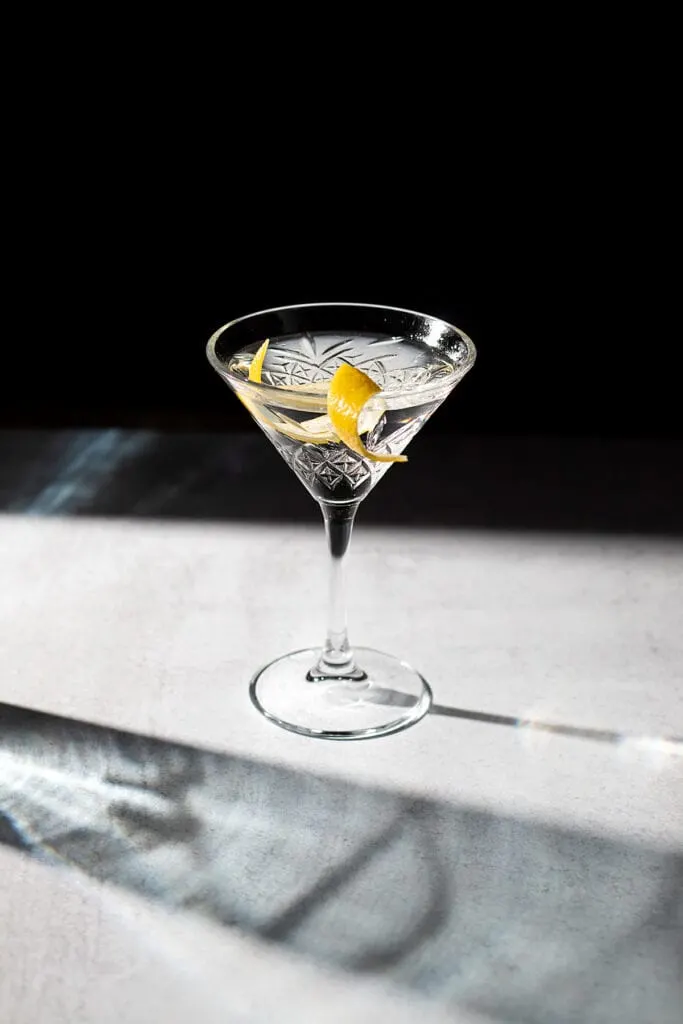
There’s an elegance and simple beauty to drinks photographed from this angle. And if you want to add more drama, shoot from just below this level. The from-below angle is especially effective with long stemmed glasses, coupes, martini glasses, and anything with a garnish that rises high above the drink.


It can also be really fun to shoot top down, making the drink part of a flat lay. Experiment and don’t be afraid to try something unexpected.
Just make sure to test the angle so that you know what will look best before you start your drinks. Now, grab your props and start setting up the shot.


Compose the image
Use a tripod to compose your picture. You can always go without the tripod when it’s time to shoot, but I highly recommend using one when you’re getting setup. Objects and their placement will look very different in person vs. through the viewfinder or on an LCD screen.
Prep garnishes in advance
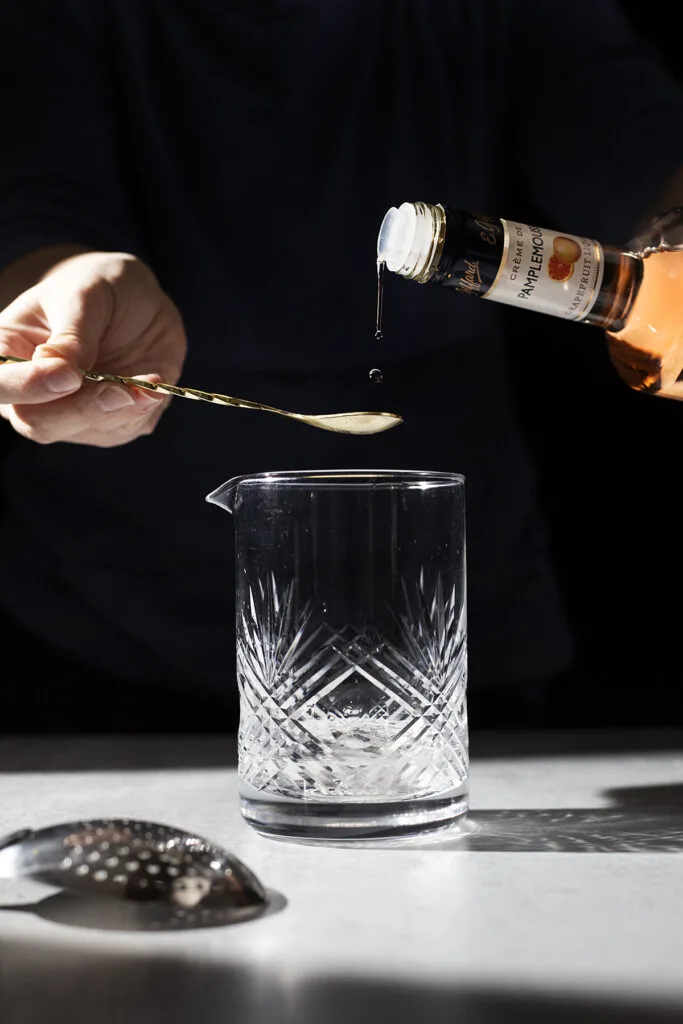
Stage your composition with empty glasses in order to align your props in advance. Next, create your garnishes. That’s right, you’ll want to do this first.
The reason for preparing the garnishes before the drinks is so that you can place them in the frame and assess how they’ll look in the final photo.
Many times I’ve thought I would garnish one way and after seeing it on the glass in the photo, I’ve realized it just didn’t look good. Take your time to ensure that the garnish looks it’s best.
Experiment with different sizes or shapes. Maybe a small sprig of mint looks prettier in one shot, and a large bouquet looks better in another.
Also think about the angle of the garnish relative to your camera angle. Position the garnish so that it faces the camera and looks natural.
Every drink presentation is a little different depending on the glass, colors, camera angle, and focus.
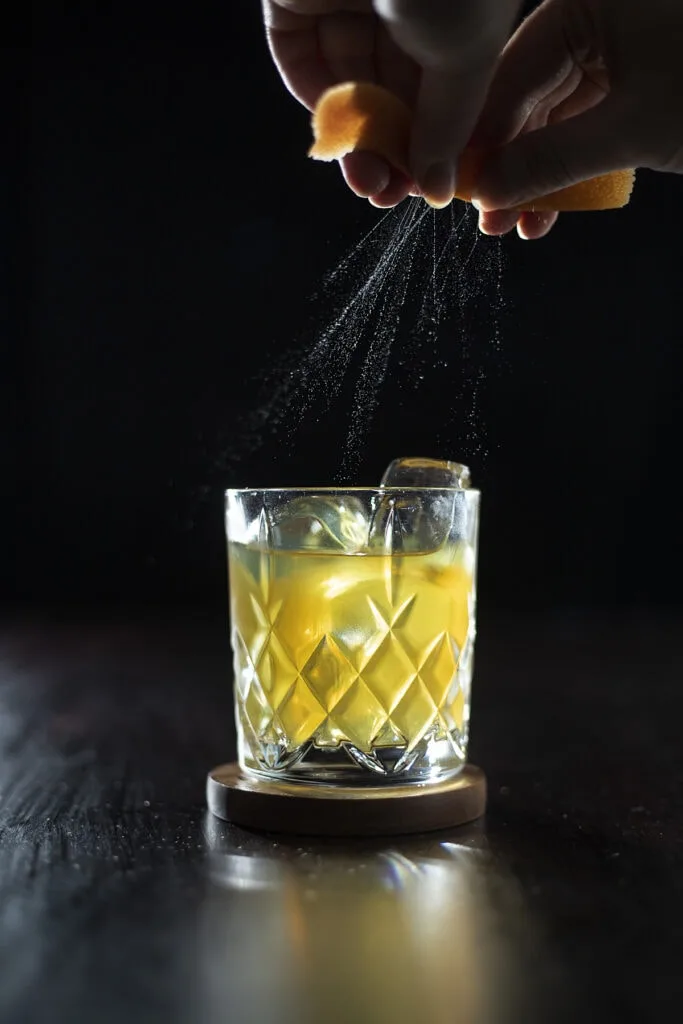
It takes a little practice to make gorgeous citrus peel garnishes, but they can really help a cocktail photo shine. No matter your skill level, you can make beautiful garnishes! Find tutorials in my Guide to Citrus Peel Garnishes or 5 Easy (and Beautiful) Cocktail Garnishes.
Adjust and control your lighting
Now you can begin to manipulate the light. Position a white reflector or a piece of white foam board across from the window or single photo light, bouncing the light back onto your drink.
This will help to fill in any areas that were too dark or in shadow. You can adjust the position of the fill card to bounce more light onto the side or the front of the glass.
Pro tip: well defined edges on both sides of your glass/drink will help it stand out from the background.
When shooting on darker backgrounds, it can be helpful to use white reflectors to brighten the edge farthest from the light.
When shooting on a bright white background, it’s sometimes helpful to use a piece of black board, also known as a black flag. This can prevent the edges of the glass from fading into the background, which is a very common issue with drink photos.
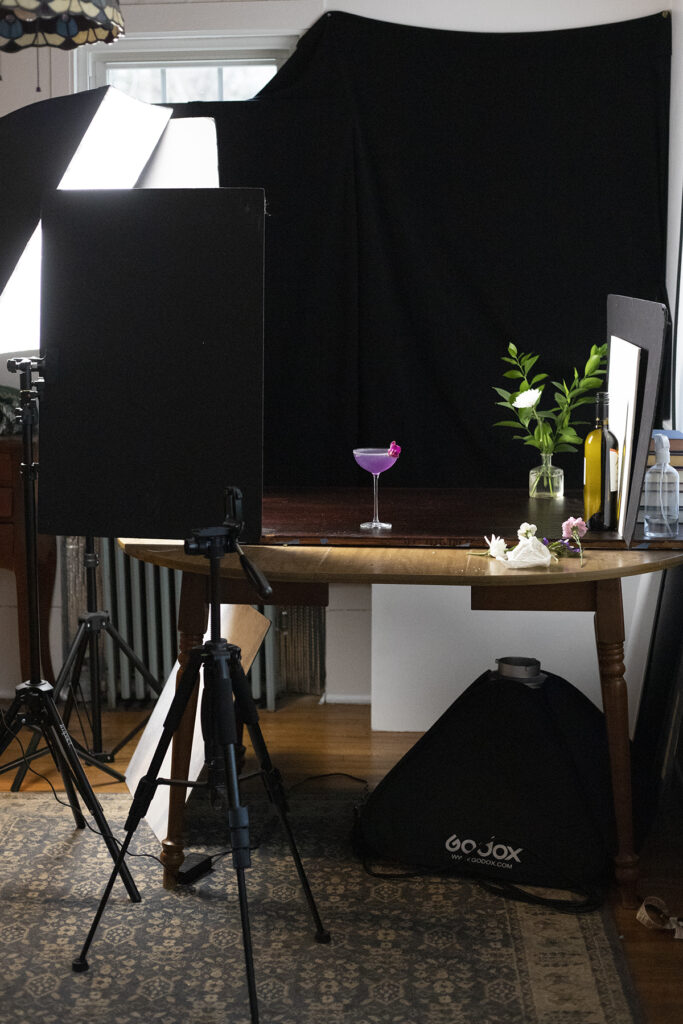

Having a few pieces of white and black foamboard on hand will allow you to do A LOT with natural or studio lighting.
I often use lightstands and clamps with my reflectors and black flags so that I can precisely position them to bounce or block light.
One key way I do this for my dark and moody images is to angle a black card to the side of my softbox (or window) to block light from hitting my backdrop. This helps give me a solid black background.


Hard light
Tip: If you find that you often have harsh, direct sunlight from your window to your shooting surface, go with it! This is called hard light and it can make for some gorgeous cocktail photos with pretty shadows and reflections.
What makes hard light a challenge is dark shadows and overexposed highlights. To make sure your photos are successful, be sure to expose for the lightest area of the photo.
This means you will be underexposing the darker areas of the photo, but you’ll be able to adjust those areas when you edit the photos later.
If you expose for the mid-tones or shadows, you’ll end up with blown out, completely white highlights that you won’t be able to correct in post.

If you’re skilled with photo editing, you can shoot two exposures, one for the highlights, and one for the shadows, and stitch them together in photoshop or photo editing apps.
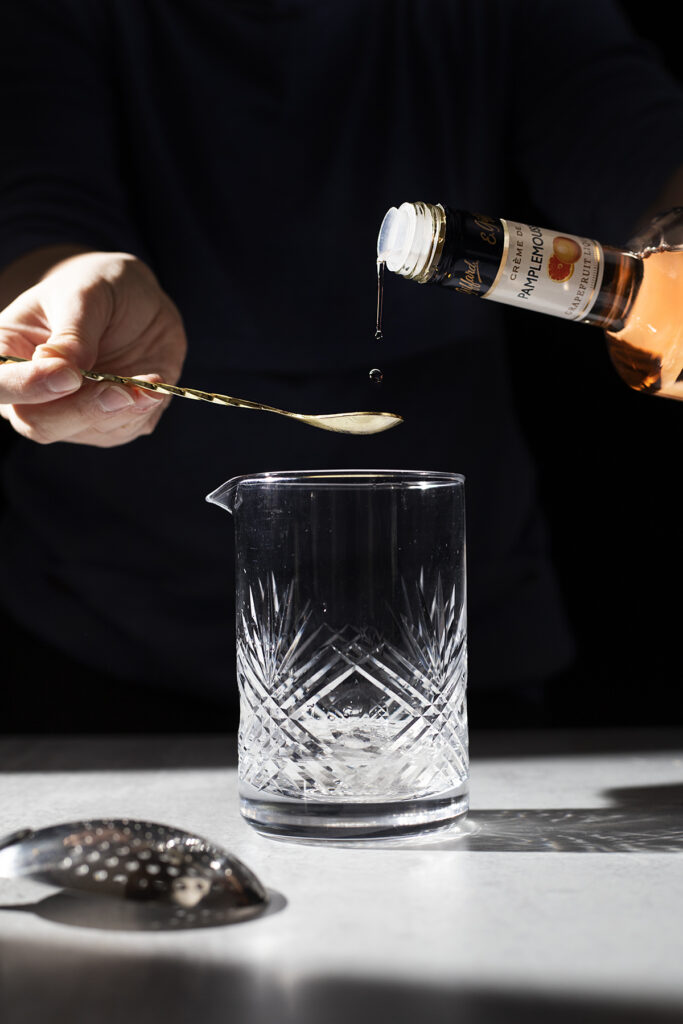
Now that your lighting, glass, and garnish are coming together, it’s time for styling.
Styling & storytelling
Prop styling helps your photos tell a story. Maybe a mixing glass and a bright red liquor bottle can be seen in the background. There’s an orange in the foreground, missing a swath of peel.
These clues might help tell a classic cocktail lover that the red cocktail in the photo is a Negroni. This is a straightforward example, but you can tell other stories, too.

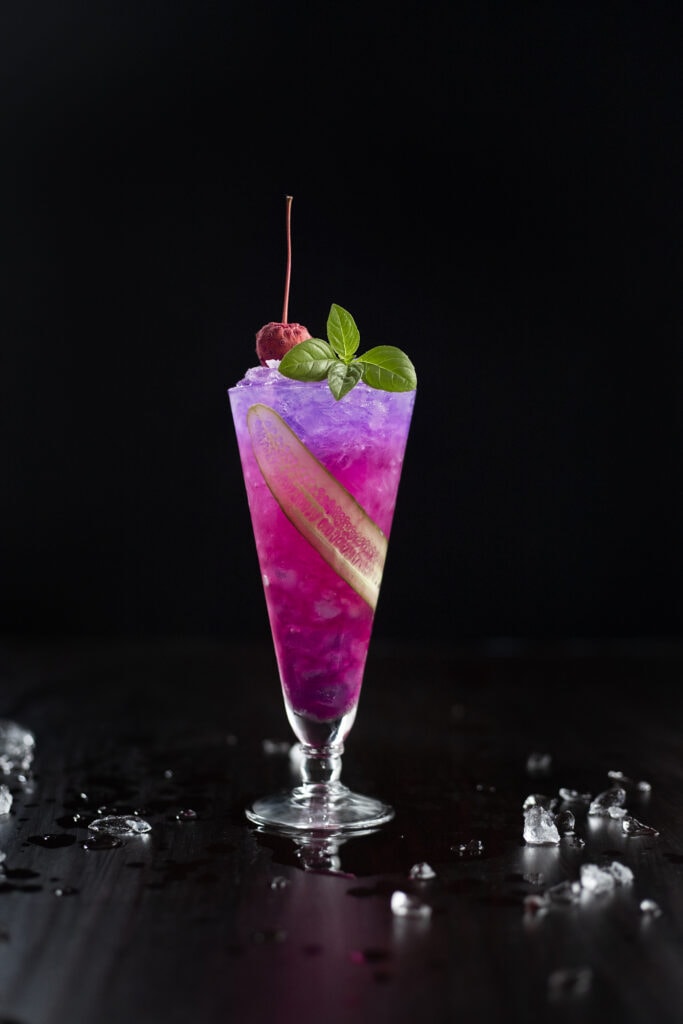
I love to style with natural elements like plants and flowers. The types of plants might tell the story of the time of year. Fresh fruits give us a clue about flavors.
Tools tell us how the drink is made. Subtle, small details can say a lot, so don’t think you need to use a lot of props. I like to start with several props and then edit aggressively until only what is absolutely necessary is left.
You want to provide enough visual interest to keep someone looking at your image without going too far and turning it into visual clutter. Some of my very favorite cocktail photos have the simplest, most pared down styling. Less really is more.


Rule of odds
When choosing props or the number of drinks in the frame, try an odd number, like 3 or 5. An odd number of elements is often more visually appealing than an even number. Arranging objects into triangular shapes cam help guide the viewer’s eye through the frame.
Elements of composition
When arranging your props and your glass(es) in the frame, there are a few things to keep in mind to make a great composition. First, be sure to consider the full space of the frame (the foreground, background, top and bottom, etc) rather than hyperfocusing on the area where the drink is located.
White space
Be conscious of the areas where there’s visual movement and make sure to leave areas of white space (empty spaces) for breathing room. The spaces where you don’t place props are just as important as the areas you do!
Also make sure that you leave enough room around the edges of the frame for any cropping you might need to do later. Be aware of bottle labels placed along the edge of the frame. If visible text is cut off, make sure it’s intentional.
Create movement
Use the shapes of your props to create a sense of movement around the frame. Curved objects near the edges of the photo can help to frame the drink, encouraging the viewer’s eyes to end up there. In addition to framing your main subject, experiment with leading lines.

Leading lines
Leading lines are visual elements that point or lead to the main subject. It could be as simple as a bar spoon in the foreground pointing towards the drink in the center of the frame.
These visual elements make for great photos because they tell our eyes where to look. Create a path for the viewer’s eyes to follow around the frame.
Colors and contrast
A frustrating part of photographing drinks is dealing with sometimes less than beautiful colors. Many fantastic drinks are brown, which can be a tough color to make shine.
I love to use some back lighting whenever I have a brown cocktail to shoot. When a drink like an Old Fashioned is illuminated from behind, the dull brown becomes a beautiful golden or bronze color.


Another element that can help less colorful drinks to look their best is to use pops of color in the garnish or props. I try to avoid having my drink and garnish be the same color or the same tone.
Having contrast between lighter and darker within the drink will make a big difference. Contrasting a drink's color with the color of background elements can also help it stand out.
For example, a purple drink surrounded by lots of greenery will stand out a lot more than a purple drink surrounded by purple flowers.
Rule of thirds
The rule of thirds sounds fancy but it’s just a composition principle that divides the image into thirds, both vertically and horizontally. The places where those lines meet make for visually pleasing spaces to place your subject. Most DSLRs and even iPhone cameras have a grid option on the display.
The rule of thirds is a helpful tool when composing an image, but it’s by no means a carved-in-stone rule. Compose your elements in the way that you find most appealing. I often use the rule of thirds when deciding where to place my garnish within a photo.
Also consider the aspect ratio you’re working with. What’s the end purpose for this photo? If the answer is Instagram, make sure that your composition will still make sense when cropped to 3:4 or 1:1. I don’t recommend cropping to square, if you can help it. The 3:4 ratio gives you much more space to work with and a larger image on Instagram.
Now that you’ve maneuvered through lighting, styling, and composition, decide on your focus and consider the depth of field you’ll want to use.


Depth of field
Depth of field refers to how much of your image is in focus. A shallow depth of field means that there’s a limited area of the picture in focus. A deep depth of field means that a lot of the photo is sharp.
Deep depth of field is great for landscape images or flat lays, where you want everything to be equally sharp. But often when photographing cocktails, a shallow depth of field makes for a better image with a more clear focal point.
Most of the time, I like to make my drink and garnish the sharp focus of the image, and let everything else slide into a comfortably hazy zone.
However, when I take action shots like pouring a drink and I want to be sure that the liquid is in focus, I will use a deeper depth of field.
Aim for a deep depth of field when shooting anything top down, like a flat lay.
If you’re a new photographer, don’t be intimidated by depth of field. It’s easy to manipulate if you have a manual camera.
Simply set the camera’s aperture to its widest setting (lowest number f stop), and then increase or decrease the shutter speed until the light meter indicates a proper exposure.
Capture that image, then adjust the f-stop to a much higher number (thereby making the camera’s aperture smaller, and letting less light in).
Adjust your shutter speed again and capture a second image. You’ll see that the first picture has wide areas out of focus, while the second image has much more of the composition in focus.
Managing reflections
One of the hardest parts of photographing drinks is dealing with reflections. A pesky glare can really disrupt the photo and detract from your gorgeous drink. Luckily, there are three primary things you can do to eliminate unappealing reflections:
Adjust your lighting
If you have any light at all to the front or sides of your glassware, you will likely have some reflections. Using only backlighting will eradicate most reflections, and it can also give drinks a gorgeous glowy look.
However, it’s not practical for every drink or every shoot. Instead, try lighting to the side but just slightly back. This can help minimize some of the reflections.


Photograph in the “window of fog”
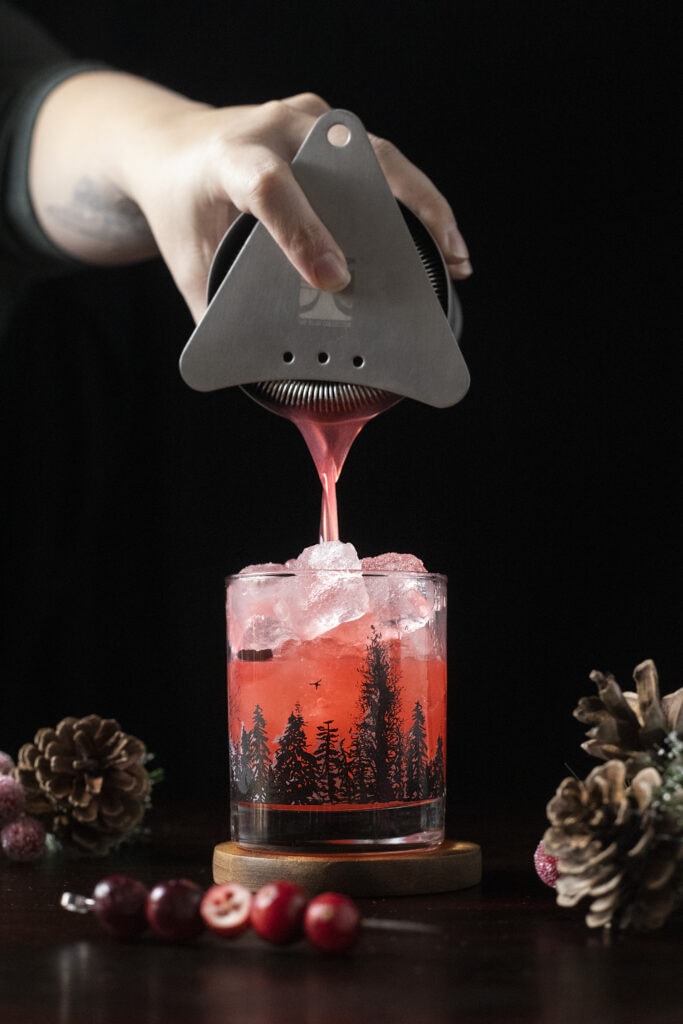
The next step to avoiding reflections is to use that frosty liquid to your advantage. A minute or so after a cold drink is poured into a glass, the exterior becomes covered with a light layer of condensation.
At this point, it’s essentially like a light fog over the glass, completely eliminating unwanted reflections. How long this translucent layer lasts can vary wildly depending on temperature variables, but it’s often very short lived. I call this brief time the “window of fog.”
Over time, as the drink warms in a glass without ice (like a coupe glass), the condensation will evaporate and you’ll have all those pesky reflections again.
In a glass filled with ice, the condensation will continue to build, it will bead up and become larger droplets. Those droplets will eventually run down the glass, leaving streaks behind them.
The areas where the condensation has dripped are then prone to glaring reflections. In my opinion, not cute. I try to do all of my shooting during the “window of fog”, when the drink and the glass both look pristine.
Some people like the look of beaded up condensation on a glass. If that’s you, you can re-create the look by mixing equal parts water and glycerine in a spray bottle. Mist on the glass (or props like fruit) and it will stay put a lot longer than real condensation.


Use a polarizing filter
Polarizing filters are inexpensive lens filters that reduce glare. It’s a fantastic tool that any food photographer should have in their kit.
To use the filter, you simply screw it onto your camera’s lens and slide it around until it’s properly oriented. Aim your camera at your glass and as you turn the filter, you’ll be able to see the reflections shift.
Polarizing filters can dramatically reduce bright reflections on things like liquor bottles. I also like to use mine to tone down any reflections on my glass above the fill line.

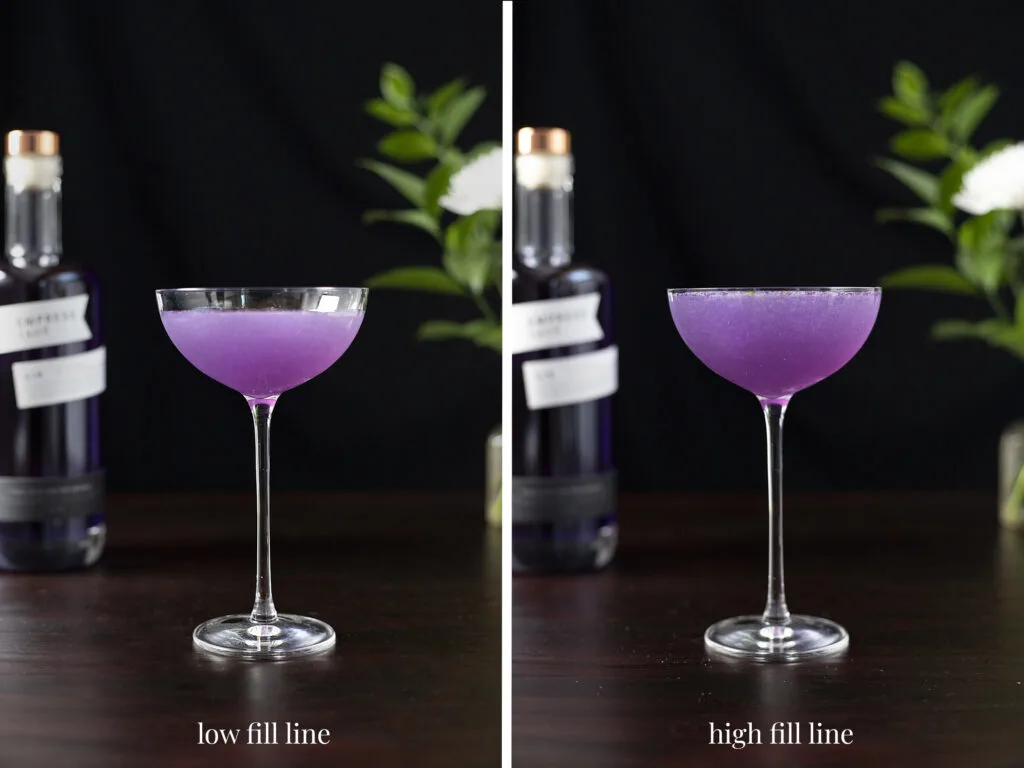
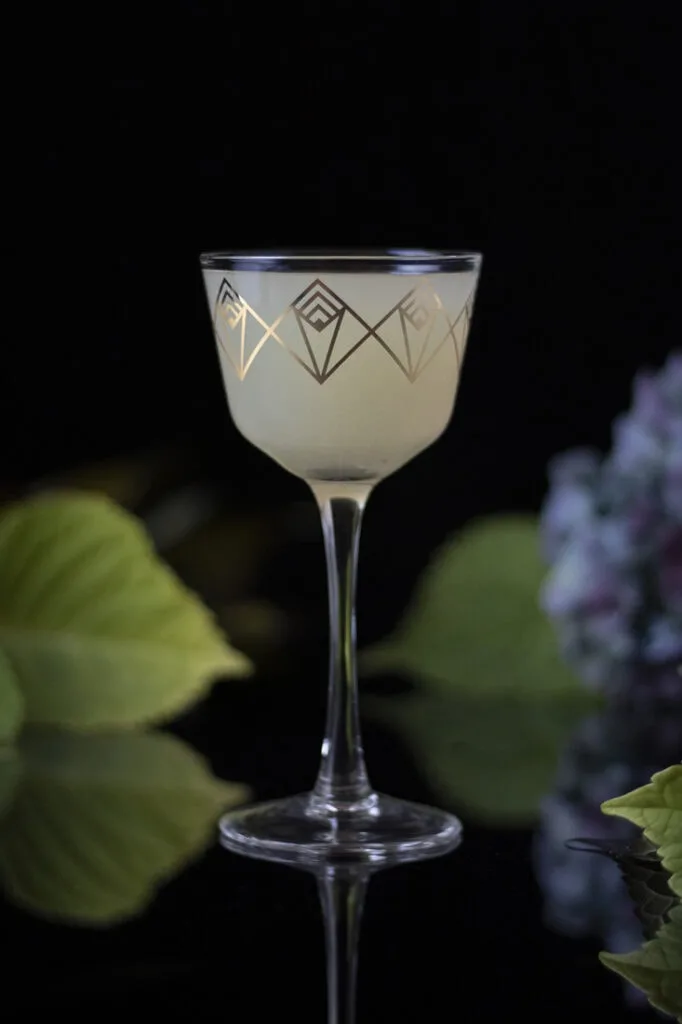
Consider your fill line
The fill line is the place where the liquid in the glass stops. Think of it as how full or empty your glass is.
An appropriate fill line for most drinks (aside from wine) is about an eighth or a quarter of an inch from the rim of the glass.
However, if we’re trying to avoid reflections and we want to use that window of fog to our advantage, it’s a good idea to aim for a pretty high fill.
Otherwise, there will be stark white reflections just above that fill line. In addition to helping avoid reflections, a nice high fill line makes a drink look better (even if it’s perhaps not very practical in reality!)
Remember at the beginning how I said to keep volume in mind when choosing glassware? This is why.
You want to make sure that the drink you’re making will fit properly in the glass you pick, and not leave an excessive space above the fill line. A real-life glass half full will always look half empty in a photo.
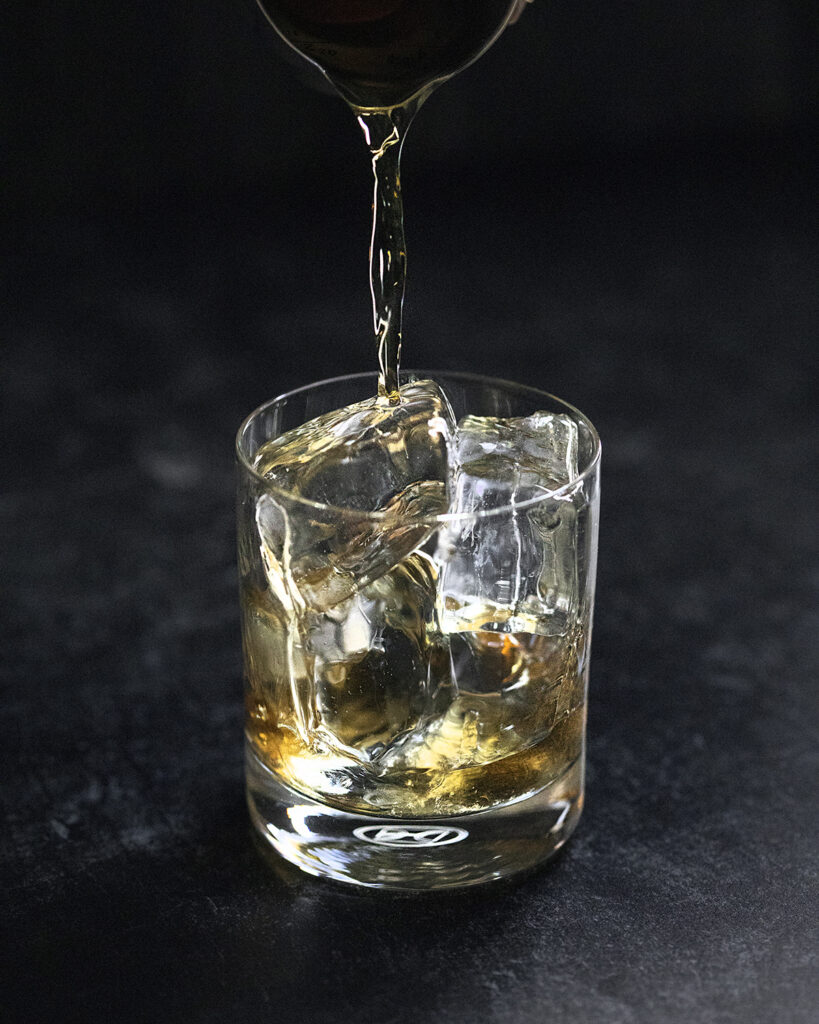

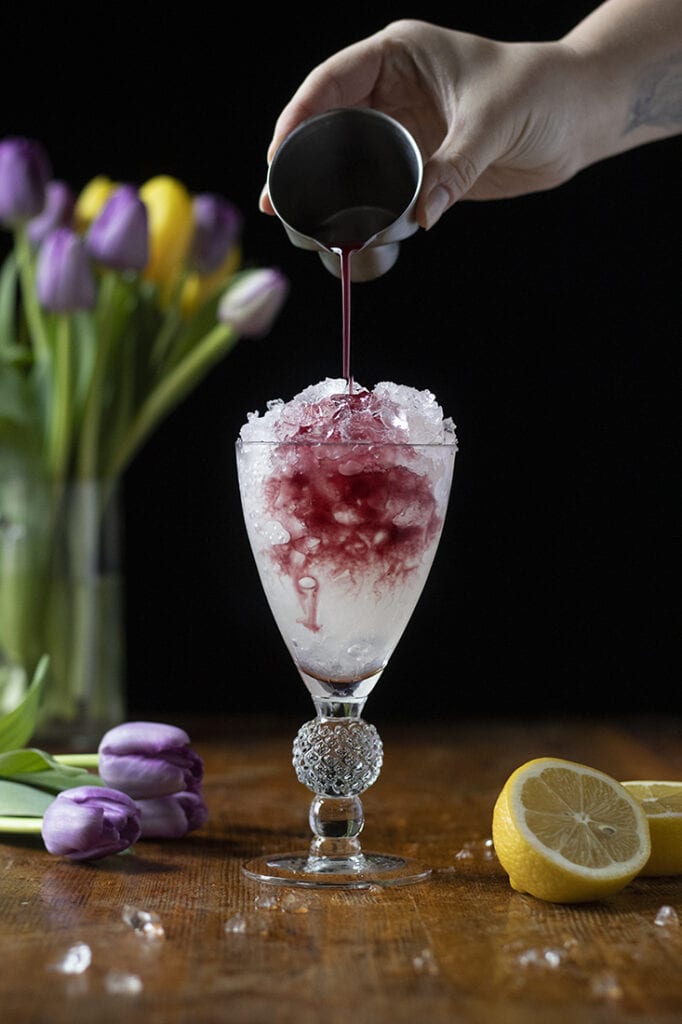
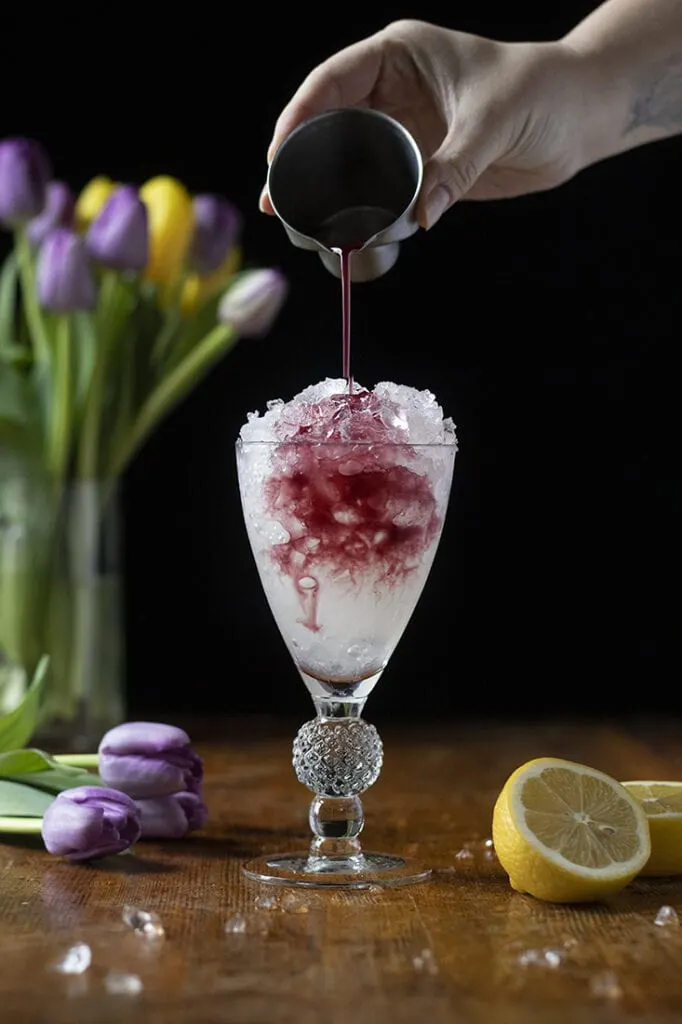
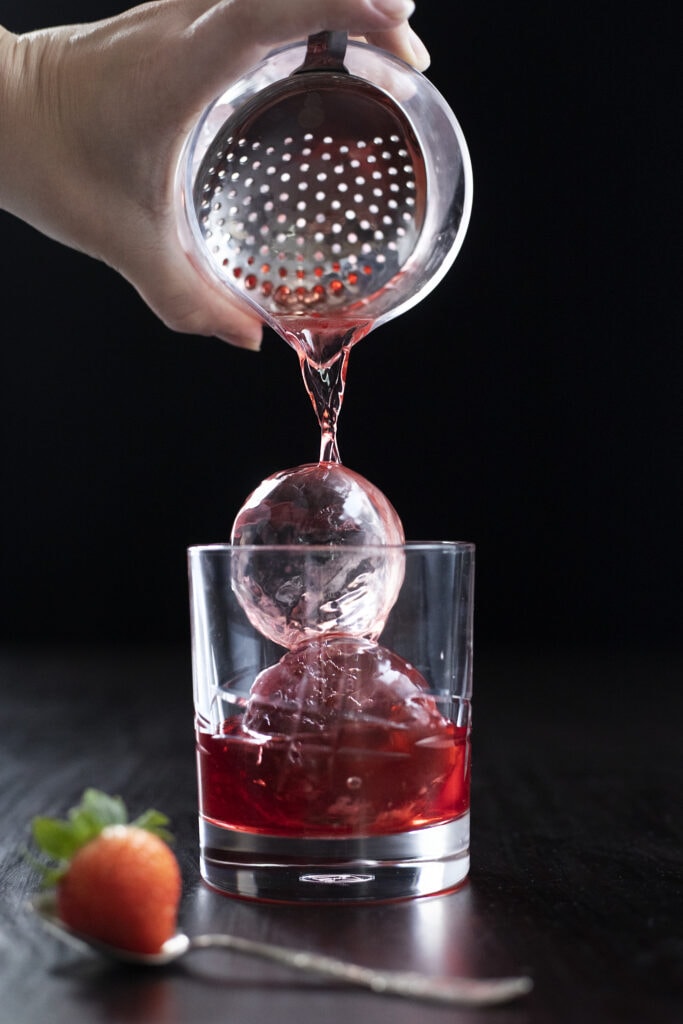
Quality and quantity of ice
Let’s talk about ice. Prior to diving into the world of craft cocktails, I had no idea just how critical ice is to drinks of all kinds.
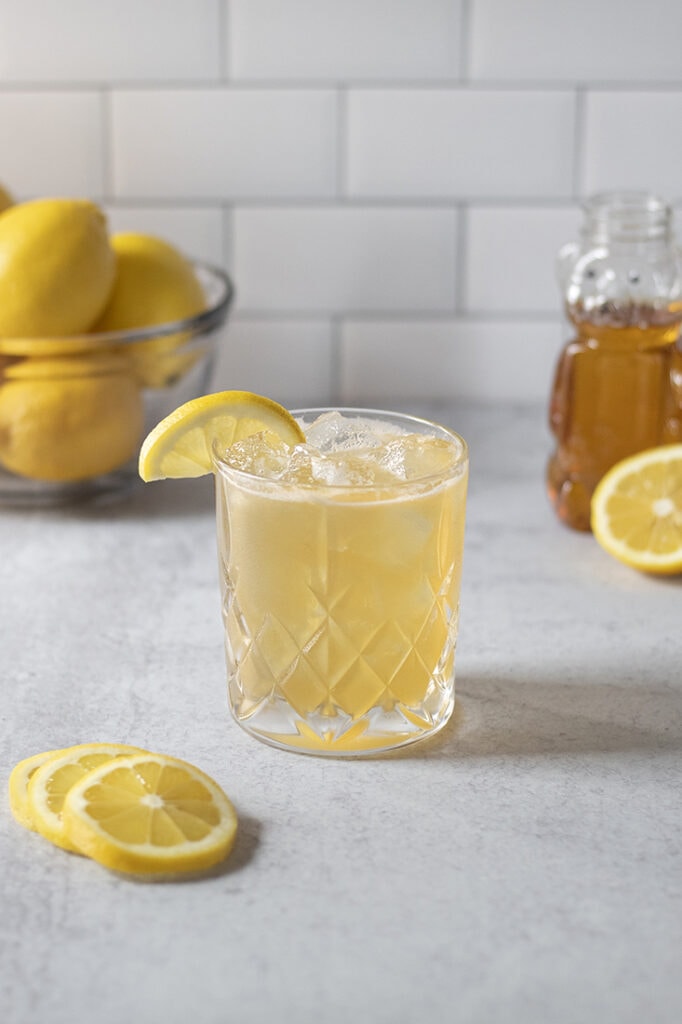
When taking drink photos that require ice in the glass, like iced tea, be sure that you fill the glass to the brim with ice. Not only does this make for better drinks in general, but the drinks will look so much better too.


A drink photo that shows a few ice cubes floating near the top and none below tends to look sad and watered down, like it’s sat around too long and melted.
Instead, aim to fill the glass fully with ice so that when you add your liquids and some of the ice melts, there will still be enough to visually fill the glass.
A small detail like this can make a big difference with how your photos look and feel. Your drinks will also be colder and less watered down.
Chances are, if you’re reading this, you care enough about how your drinks look that you might even invest in it a little.
If there was one thing I would tell a beginner to invest in first, it would be a $2 bag of clear ice from a convenience store.
Seriously - having clear, or even just mostly clear ice pieces will instantly elevate your drink photos. If you can make your own clear block ice and cut it, that’s pro level.
But even just using bagged ice that is not the awful pure white cubes from your freezer or ice maker will make your images shine.
As an aside, making your own clear ice at home is actually very simple, and there are a variety of products these days that make it easier than ever.
I love the Wintersmiths Phantom, which I was recently gifted. This ice chest and molds allow you make crystal clear ice in perfect cubes, balls, or Collins spears with very little effort and no special skills required. I can’t recommend it enough!
To recap: use plenty of ice and make sure it’s nice looking ice. Avoid pure white ice maker cubes that make your photos look amateur. Grab a $2 bag of ice to give your drinks an instantly elevated look.


Bringing it all together for the perfect drink photo
You made it! If you’ve stuck with me this far, you deserve that cocktail. This guide has gone through the most important elements of drink photography, from lighting to styling and how to get rid of those dreaded reflections.
I hope these tips help you take better photos and get more creative when shooting drinks.
Next up, I’ll be sharing a guide to drink photography techniques, including how to freeze action like in the images below, how to capture splash shots and lighting setups with behind the scenes photos.
Let me know if there are other cocktail photography topics you want me to dive into, and be sure to tag me in your drink photos over on Instagram!

Equipment recommendations for the beginner
The first step is to get a DSLR so that you can manually adjust your exposure. I recommend Canon products because it's the brand I'm most familiar with and have been using for about 17 years now.
If you prefer another brand, look for camera bodies in a similar price range (and lenses comparable) to what I recommend below.
Manual exposure control alone will allow you much greater control over your images.
Controlling your shutter speed will let you freeze the action of liquid pouring or orange peel oils being expressed, and controlling your f-stop will let you experiment with focus by creating a shallow or deep depth of field.
We will go over exactly how to create these kinds of images in the next post. Subscribe to be notified about my next drinks photo guide!
Recommended DSLR if you’re just starting out:
It took me years to realize this, but a quality camera lens is actually more important these days than the camera body.
Thanks to technology becoming cheaper and cheaper, digital camera bodies even at budget price points today are all pretty well equipped with good quality sensors.
If you’re just shooting for your blog or Instagram, a low-to-mid range camera body is probably more than sufficient.
For this reason, I recommend picking up a budget camera body and one or two high quality lenses will give you the biggest bang for your buck. The Canon Rebel t7 has good reviews, provides the basics, and is very affordable.
Recommended lenses for shooting drinks:
- Canon 50mm
- 100mm macro (note: this is NOT the 100mm macro IS, which is a fantastic lens but cost prohibitive for a beginner)
50mm and 100mm macro are the two lenses I use the most for cocktail photography. Keep in mind that these are not zoom lenses, so you do have to move closer or further away from your subject.
A standard f/1.8 50mm lens is very budget-friendly about ~$125 and it will let you achieve a beautifully shallow depth of field or background bokeh.
Basic continuous light kit:
Neewer LED light kit with softboxes
Other helpful tools:
- Polarizing filter (choose the size mm that will fit your lens)
- Diffusion panel
- Reflectors (or buy white and black foamboard panels from craft stores or even Walmart.)
Jonathan Armstrong
Thursday 28th of April 2022
Hi there, where are you based? I work for a liquor company and we sponsor different educational seminars for cocktail & spirits. Be great if we could find a way to work together.
Faith
Thursday 10th of March 2022
I have been looking at polarizing lenses and like you, I use a 100mm macro lens. Polarizing filters only seem to go to 95mm. What do you use for your 100 mm lens if you can't use a polarizing filter?
Faith
Thursday 10th of March 2022
@Amy, Oh. Wow. I feel dumb. I so appreciate you taking the time to explain that to me! That makes so much sense. *facepalm*
Have a great day!
Amy
Thursday 10th of March 2022
Hi Faith! Lens filter size and focal length are two different measurements. For example, the filter size of my 100mm lens is 52mm I believe. The number is often printed near the front of the lens or you can look up the size based on the make and model of the lens. Hope this helps!
Helen Winduss
Friday 28th of May 2021
You really are an awe-inspiring photographer and cocktail stylist! I was literally gasping and (enviously swearing!) at your AMAZING shots and beautiful glasses! And you explained the steps to take so well.
The glasses for the Pineapple Absinthe, and the ones with the long striped-texture / thick stem - were they from a Thrift store? I would love to know what they are so I can try to buy them from somewhere.
amy
Friday 28th of May 2021
Thank you so much Helen! The glass with the thick ribbed stem is called the May coupe and it’s from Fferrone Design.
Priyanka G
Monday 8th of March 2021
This is so helpful! I am very new to cocktail making and have zero photography experience. Def bookmarking this page! Thank you for sharing your knowledge